Wednesday, May 30, 2012

Celebrating One of My Favorite Things with Practical Scrappers


I will let you in on a little secret.  Today is my birthday.  Yippee!!!  And what better way to celebrate than by showing you one of my very favorite things to do on a layout.  What is it?  Can you guess?  It's machine stitching!  And PRACTICAL SCRAPPERS chose today, of all days, to do a post on machine-stitched layouts.  Coincidence?  I think not!  So, of course, I contributed with this layout, on which I machine stitched just about anything that could possibly move.  And the little pieces (like the diamond-shaped pieces of paper) that I was too lazy were too little to be easily stitched - I just doodled around those edges so they would look stitched, too.

To get started, I used a wonderful sketch by the very talented Amaryllis found over at SCRAP THAT, a kit club where my bestie, ALISSA, is a design team member.  Papers are from Pink Paislee's Prairie Hill Collection, and my shaped papers were cut out using my Silhouette.  The picture you see?  It is one of my second daughter's engagement photos that I am totally in love with!  Let me warn you, there are about 50 more pictures from her engagement shoot that I am also "totally in love with" so you will be seeing quite a few more!  So gird your loins! (ha! - I love using that phrase)

I love the pops of color this cluster of flower adds.  They are by Basic Grey, but I thought they worked quite well with this layout.


Machine sewing across chipboard alphas is a great look, I think.  Don't be afraid, your sewing machine should be able to handle it quite easily as long as you go slowly.


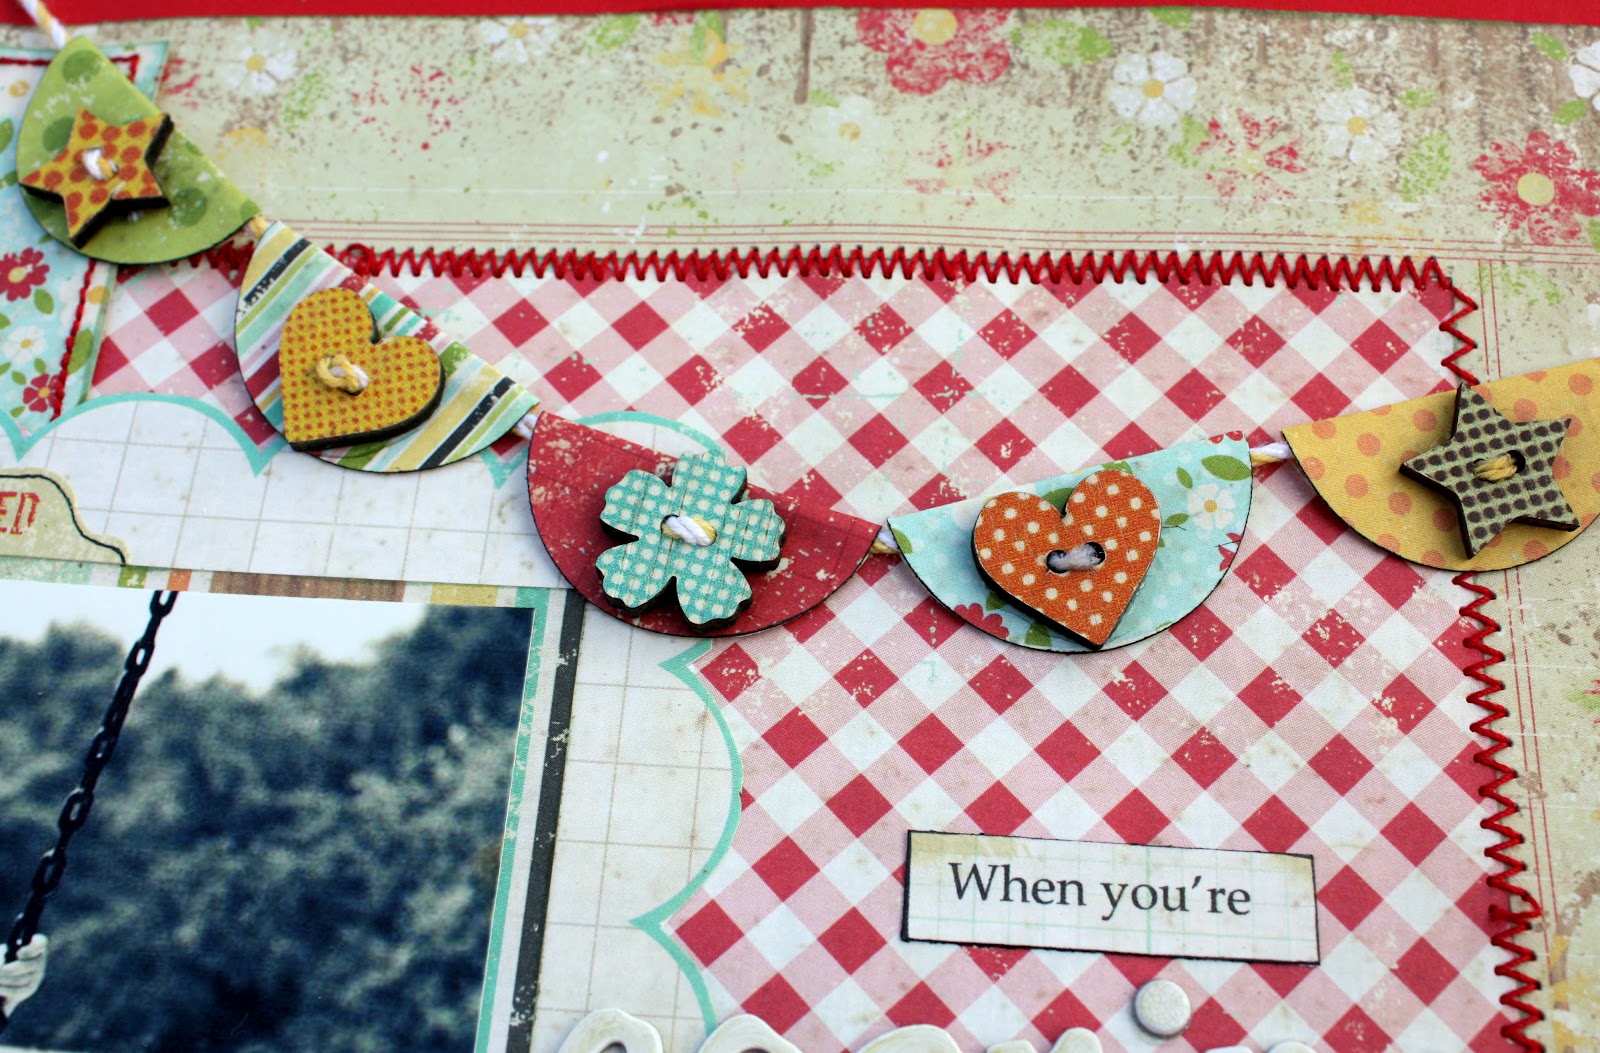
I love adding a zig zag stitch as a way of defining my border near the edges of my layout.  Smaller pieces of paper use a simple straight stitch - sometimes once around and sometimes twice around the paper - almost always deliberately NOT straight, because I like the "messy" look it provides.  You can see that my small diamond shapes have doodling in brown marker that matches the thread I used in my machine stitching.  Even my photo has a zig zag stitch going across it as an accent (and to hold my twine in place).

Layers + stitching = LOVE!!!


That's all for today.  Now, I am off to have breakfast with my oldest "babies" but, before I go, I wanted to leave my birthday wish for YOU.  Celebrate life.  Celebrate it every day.  Document it.  LIVE it.  Enjoy the beauty and the wonder and the excitement (and even the uncertainty) that is each new day.  I love you all and look forward to spending my next year with you!

Hugs and Kisses!

Tuesday, May 29, 2012

Lori Whitlock End of School Projects


It is the last week of school in our neck of the woods, and that means making little gifts for favorite teachers and besties.  As always, Lori Whitlock makes that process easy - in fact, the hardest part is having to make a decision as to which cutting files to use - never a simple task when she has so many wonderful designs to choose from!

I chose to make small flower arrangements as well as little purses and boxes to hold treats and gift cards.

I fell in love with these small SCALLOPED EDGE PURSES as soon as I saw them in Lori's STORE.  The purse is cut as one piece, with fold lines that make it a snap to assemble.  Of course, I used ECHO PARK'S Hello Summer Collection (designed by Lori), which I thought to be quite fitting for end-of-school gifts!  To decorate this purse, I used Lori's Star tickets and Pinwheel files (which I L-O-V-E and plan to use again this summer!).


I made this purse a little over an inch larger than the original design so that it would be large enough to hold gift cards, which always seem to be a hit.

The original size purse looks like this, and I used it to hold some yummy skittles.  To decorate it, I used a brad from the Hello Summer Collection, a butterfly from the sticker sheet that comes with the paper pack (I just added a small pop dot behind it), and a flower banner from Lori's files.

The vases of flowers have Lori's cutting files used to decorate the small mason jars (Hello Sunshine Phrase, Dragonfly, Scalloped Oval), and her shapes are also glued to small bamboo skewers and inserted in the bouquets (Pinwheel, Sun, Bird Flourish).  The "Sweet Box" is actually designed to hold Snickers bars, and the file includes an optional wrapper to go around the candy bar.  I decorated mine with Lori's "You're Sweet" phrase and left off the "you're" on my project.  I also used the little star shapes left over from my star tickets to decorate the front.  


Because it is already so hot here in sunny Texas, I decided not to use chocolate.  Instead, I simply filled my box with more Skittles.  I don't think I will get any complaints!


That's it for today, but be sure to stay tuned as Lori and the gang (me, too!) will be having another blog hop to kick off the summer in just a couple of weeks!  Details to come!

I Design for Crafting Ireland!


Top o' the morning to you!  Okay, that was a little cheesy I know, but I am so excited that I have been chosen as part of the design team for Crafting Ireland, which is exactly what it sounds like - an online crafty, scrappy, artsy publication created by a pair of wonderful women in Ireland. 

I am always a little skeptical about online publications, but when I checked CI's out, I was blown away by the talent and the ingenuity I found there!  The new Design Team's work will be featured in Issue 11, coming out at the end of June.  But Issue 10 is out now, and it is full of fantastic inspiration and ideas.  Check it out HERE.  They also have a BLOG full of info and additional projects. 

I am so excited to be part of this innovative international team, and I can't wait to share my projects with you!

Sláinte! 

Monday, May 28, 2012

Sketch #134 - Come Play with Us!


It's that time again over at LET'S CAPTURE THESE SKETCHES - a new fantastic sketch and a lot of wonderful inspiration by the design team members.  This layout is my take on Sketch 134, with a series of photos of my youngest showing me her newly acquired front somersault skills into our pool.  She doesn't yet have the rotation fully complete but, as often as she practices, it won't be long!

I used Echo Park's Hello Summer papers (totally loving that collection!) and embellishments.
I placed pop dots behind several of the (completely, totally adorable) stickers to add a little dimension.  The pinwheel sticker is attached to an ordinary tootpick and had a tiny button glued to the front - so easy to do and such a cute end result!


I doodled on just about every piece of paper and embellishment to make everything stand out.  Love the effect, and it was a lot quicker than machine sewing.  This little bird was fussy-cut from a scrap piece of paper.  Instead of worrying about cutting out his teeny-tiny legs, I simply cut them off and then drew them on my paper with a marker before gluing the bird to my page - much, much easier!


Some simple journaling and my layout was finished.

That's it for now, but be sure to stay tuned for some more fun crafty news later today!

HAPPY MEMORIAL DAY!!!!!!!!!!!!!!!!!!!!!!!

Thursday, May 24, 2012

Echo Park Sketch Challenge


I have been enjoying a few days of "me" time (which has been pure Heaven!), and I actually had enough spare time to play along with this fantastic Sketch Challenge over at Echo Park's BLOG.    I love Lori Whitlock's Hello Summer collection and have been waiting for the opportunity to break it open and play with it.  And this seemed to be the perfect time!

After spending a good 30 minutes sorting through the papers because I had such a hard time limiting myself to choosing just a couple of the uber-adorable sheets of paper, I decided on the patterned papers you see with an orange background.  And after being absolutely, positively sure I had exactly the papers I wanted and gluing everything down, I came to the conclusion that, while cute, the orange background didn't give me quite the crisp summer look I was going for.  So....I ripped and cut the patterned papers away from it and put them against the white cardstock that you see.  Perfect!  Sadly, the lovely orange paper from the Hello Summer collection became a casualty - there wasn't enough left in good condition to save - but I think the end result made the sacrifice worthwhile!

Of course I HAD to fussy cut these wonderful flowers from the paper they were on and use them in a cluster.


I also fussy cut these little bees, and I doodled on just about every piece of paper and embellishment on this layout!


What kind of journaling would a dog have about summer?  Well, I think it might look a little bit like this...

That's it for now.  Stay tuned - Let's Capture These Sketches, Lori Whitlock projects, and Practical Scrappers fun coming soon!!!


Tuesday, May 22, 2012

A Challenging Weekend - Part Two


My cousin asked me to create a layout about his daughter, who just turned 16, using the picture of my choosing from his Facebook albums.  (We don't live close to each other so Facebook pics seemed the easiest choice, especially since I stalk them all the time anyway!)  I found this wonderful picture of her swinging as a small toddler and knew that I had found THE picture.  Next I needed a good sketch to get my mojo started.  BIRDS OF A FEATHER just happened to have the perfect sketch posted for the May challenge, so I decided to...ahem...kill two birds with one stone.

I used Simple Stories papers, which were perfect for fussy cutting.  Most of this cluster is made of SS bits and pieces (with a little Pink Paislee and Basic Grey thrown in for good measure).


 The journaling and title came to mind as soon as I saw the picture.  It's part of the Chorus to"WHEN YOU COME BACK DOWN" -  a fabulous song by Nickel Creek that is a long-time favorite of mine.  How did I make the journaling strips?  I simply ran a piece of scrapbook paper through my printer and printed the lyrics on it, then cut the paper into strips and glued them on my page.  I outlined the edges of my strips with black marker so they would stand out a little better against the background patterned paper.

The banner was so easy to make.  I punched out circles, folded them in half, and glued them onto Baker's Twine.  I glued down some pretty wooden buttons (by Prima) on top of my half-circles to add a little more visual interest. 

I figure I've done a pretty good job because, once I finished, I was reluctant to pack my layout up and ship it off - lol!  Here's hoping that this layout will make someone's sixteenth birthday just a little bit sweeter...

Until next time...keep it crafty!

Monday, May 21, 2012

A Challenging Weekend


This weekend, I made sure that I took time out from the laundry and the grocery shopping and the house cleaning to have a little crafty me time.  I love challenges, and BIRDS OF A FEATHER had a couple that really caught my interest.  First, I completed the Scraplift Challenge.  Now, for those of you who don't know, a scraplift is where you take another person's layout and, basically, copy it as much or as little as you like.  When I was just starting out and trying to figure out "my style" and learning different techniques, I did a lot of scraplifting.  It was the perfect way to teach myself how to get an end result that I liked.  Today, it's still fun to occasionally find a design I like and make it my own.  The best part - like most things in scrapbooking, there is no right or wrong way to scraplift.  The ONLY hard and fast rule - give credit to your source of inspiration!

I chose to lift a layout by the very talented Lisa Wilkinson, which can be found HERE.  I chose Lisa's layout because, like me, she loves to incorporate lots of layers and bits of randomness here and there.  She definitely speaks my scrappy language!  I chose some wonderful new Heidi Swapp papers from her Sugar Chic collection and lots of bits and piecesfound on my always messy work table.  The picture is of my second daughter flexing her beautiful muscles.  Her strength and determination is always an inspiration to me so I thought this picture was perfect for a layout - even if you don't see her face.  The paint is, partly, a happy accident that I was trying to clean up.  I just took a deep breath, convinced myself that messes can be a good thing, and went with it. 


I like the look the two different "fonts" of letter stickers together.  What do you think?

I just kept adding different layers here and there to get my final look.  I stitched and doodled on some layers, and I added pop-dots under others to give emphasis.  And see what I mean about randomness from my messy table?  I see things from at least five different manufacturers on this close-up!

Well, that's it for tonight.  Stay-tuned - tomorrow I will be back with my second layout from this weekend, and I can't WAIT to show it to you!

Saturday, May 19, 2012

LCOM Sketch Site

Have you been keeping up with all the supercallafrajalisticexpialadocious new sketches that LCOM's SKETCH SITE is cranking out each week? The sketches are so much fun to use and are the perfect starting point to give you a little creative nudge or to follow exactly if you choose. There are two weeks of scrapbook sketches and then one week with a card sketch mixed in. And the different layouts that everyone comes up with are completely different and provide the BEST inspiration. I normally am not a big user of circle-shapes on my layouts - so SKETCH 132 was a challenge for me. Not gonna lie - I pouted just a little when I saw ALL the CIRCLES on it. But then I started looking through my papers and realized that my May BIRDS OF A FEATHER KIT had exactly what I needed. And the rest was a lot of crafty fun!
I totally stole borrowed the idea of the different colored alphas (using the exact same alphas in fact) from the marvelously talented HEATHER LEOPARD. And while I loved the hot pink flower that came with my BOAF kit, I didn't like the more formal pearl and blingy center it had. So...I ripped it off and added a simple button. Did I throw away the center? Heck no! It's waiting on my worktable for some future project where it will be the perfect embellishment.
Can you tell I had a lot of fun with my layering and bits of randomness? Remember how I told you I have been loving the LCOM sketches...apparently, I like them so much that I even play with them during my "off weeks" when it's Team A's turn. Here is my take on SKETCH 131. The pic was taken of my wonderful children (and my soon-to-be son-in-law) after a wonderful lunch that they treated me to. And the papers were Basic Grey's new line, which I am completely, madly, deeply, truly loving!
As soon as I saw the balloons on the pages, I knew there would be some fussy-cutting going on!
Just in case you are looking at the title and wondering if (a) I was drunk, (b) I was using some unknown foreign language, or (c) I suddenly forgot how to spell - the answer is (d) none of the above. Seriously. It's from a poem by Lewis Carroll called Jabberwocky - a poem that I have loved and had memorized since I first heard it when I was twelve. You can find it in his book Through the Looking Glass (which I highly recommend) or you can simply click on this LINK to read the poem and the history/meaning/details about it. For those who don't want to read or link to anything, frabjous means "fair, joyous, fabulous" which quite accurately described my Mother's Day. One last close-up before I head back to my crafting table...
Wishing you a frabjous weekend!

Wednesday, May 9, 2012

Negative Space - Practical Scrappers

A Second post today - this one for PRACTICAL SCRAPPERS where today's challenge was (insert drum roll) to create a layout with negative space - think empty frames like the ones I used, the empty spaces from sticker or chipboard sheets, even misting or spraying around something. Yep, this is one way that negative can be a positive thing! If are here to see my Lori Whitlock project, click HERE! (or just scroll down to the next post) I am an equal opportunity scrapper, so it's only fair that if I create a layout about one of the dogs in my family, I have also got to create one about one of my cats - especially when I caught this one laying across my laptop staring intently at the screen! He had one of the keys depressed, and he was extremely interested in watching the cursor zip across the screen! My papers are all Pink Paislee (from the Prairie Hill collection). I have had these Maya Road frames for well over a year and keep finding ways to incorporate them into my layouts. They were perfect to create little pockets of negative space since they are framing, well, nothing.
I made up a little journaling because, frankly, I couldn't resist. And my Danny is FOR SURE a lover boy! Ha! If any cat were to post a personal ad for a purr-fect Persian princess, it would be him!
Finally, a cluster of randomness and stitching - two MUSTS for me!
Have you created a negative space layout? No? Well, then, why don't you challenge yourself to give it a try! Until next time... Happy Crafting!

Mother's Day Project with Lori Whitlock

It's that time again. What time is "that time" you ask? It's LORI WHITLOCK time!!! She has all these fabulous new shapes and files out, many of which are PERFECT for those special Mother's Day gifts and cards. I fell in love with this STATIONARY BOX AND CARD SET and thought it would be the perfect little gift for my mother, who loves everyday cards. The stationary set comes with one card, but I was easily able to fit four cards in mine. My cards have buttons and other "dimensional" items. If I did not use those, I think the box would easily hold six note cards. That's a lot of cards for a little box that, at 4x3 inches, is slightly larger than a deck of playing cards!
I used ECHO PARK'S Note to Self Collection, which is such a great "gender neutral" set of papers (designed by Lori Whitlock, of course) that can be used for a wonderful variety of projects and layouts! The cards were so simple to make. I simply added slightly smaller pieces of plain cardstock inside to create a nice writing surface and a few decorations to dress up the outside. The Echo Park paper was so cute, it didn't really need any special dressing up! Here are my cards:
(I used a Lori Whitlock design for my label)
(The damask shape is by Lori Whitlock, too!)
That's it for now. But Lori's got lovely new spring items popping up in her shop almost every day, so be sure to check in and find something that is just right for YOUR craftiness.

Sunday, May 6, 2012

NSD Part Two

Happy Sunday everyone! I should be cleaning my house and doing laundry, but instead I am playing around on my computer. I slept until after 9 am this morning, which I NEVER do, so I figure I must be in an alternate universe and the "real me" is out there cleaning the house somewhere like a good, responsible person. Please don't tell me differently! This is another layout I worked on yesterday for NSD. I completed this for two challenges - one over at LET'S CAPTURE OUR MEMORIES to use certain scrapbook trends (I chose the color orange and triangles and one over at PAPER SECRETS to use a handmade kite. The picture is my oldest daughter, who leaves me speechless sometimes because she is so lovely (both inside and out). Papers are all Pink Paislee's Prairie Hill Collection and ephemera is...well, a little bit of this and a little bit of that from the disaster zone that was my work table yesterday. I wanted flowers on my layout, but all the "pre-made" ones were just too bulky for me. So I made my own and included them in this cluster.
I created another (smaller) cluster at the base of my kite because if one cluster is good, two is better. Right?
And finally, my kite. I had so much fun making this. The triangles were originally different patterns, but I colored them all in with a brown marker to give a little more cohesiveness. I felt it was just a little too busy otherwise. I added some stitching to define the kite a little more. I love the way it turned out!
That's it for today, but I'll be back with some more fun projects to share later this week!