Sunday, June 30, 2013

Banners and Arrows and Sketches, Oh My!

Today at PRACTICAL SCRAPPERS, we are playing with banners and flags - which is one of my mostest favoritest never-want-them-to-go-out-of-style trends!  I'm not kidding - just this morning there was a poll on Facebook asking what trend we never wanted to go out of style.  And my answer was, of course, banners!
 
I have had the Lula Bug with me all weekend, and the pool was calling our names, so my free time to scrap was pretty much set to zero.  But, you have to live life to be able to document it.  So that is what we were doing - living life! (and maybe getting a lil' bit sunburned in the process)
 
Anyway, what that means is that when I found a way to combine a fun June sketch challenge over at MY MINDS EYE with Monday's Practical Scrappers assignment to create a layout with banners and flags, I jumped at the chance.  In case you didn't see it, the sketch can be found HERE.  And you see my take on it above - a lot "fuller" than sketch, but that's what I love about scrapbooking.  Everything is open to interpretation!
 
I had so much fun creating all the details on this layout.  Want to see a close-up or two?  Why, of course you do!!!  Here you go:
This is my banner that I made with my Silhouette Cameo.  I love the fact that the banner file already included the word "today" as a cutout.  So that the word could be seen clearly, I layered a solid pink eyelet trim behind each cutout. I also machine stitched just about every sheet of paper on this layout, and I added pop dots in several places to further accentuate my layers. 
 
Here is an even closer close-up:
 I absolutely love all the rich detail of MME's Find Your Wings and Fly Collection!!!  And MME always has just the right ratio of shabby chic and trendy.
 
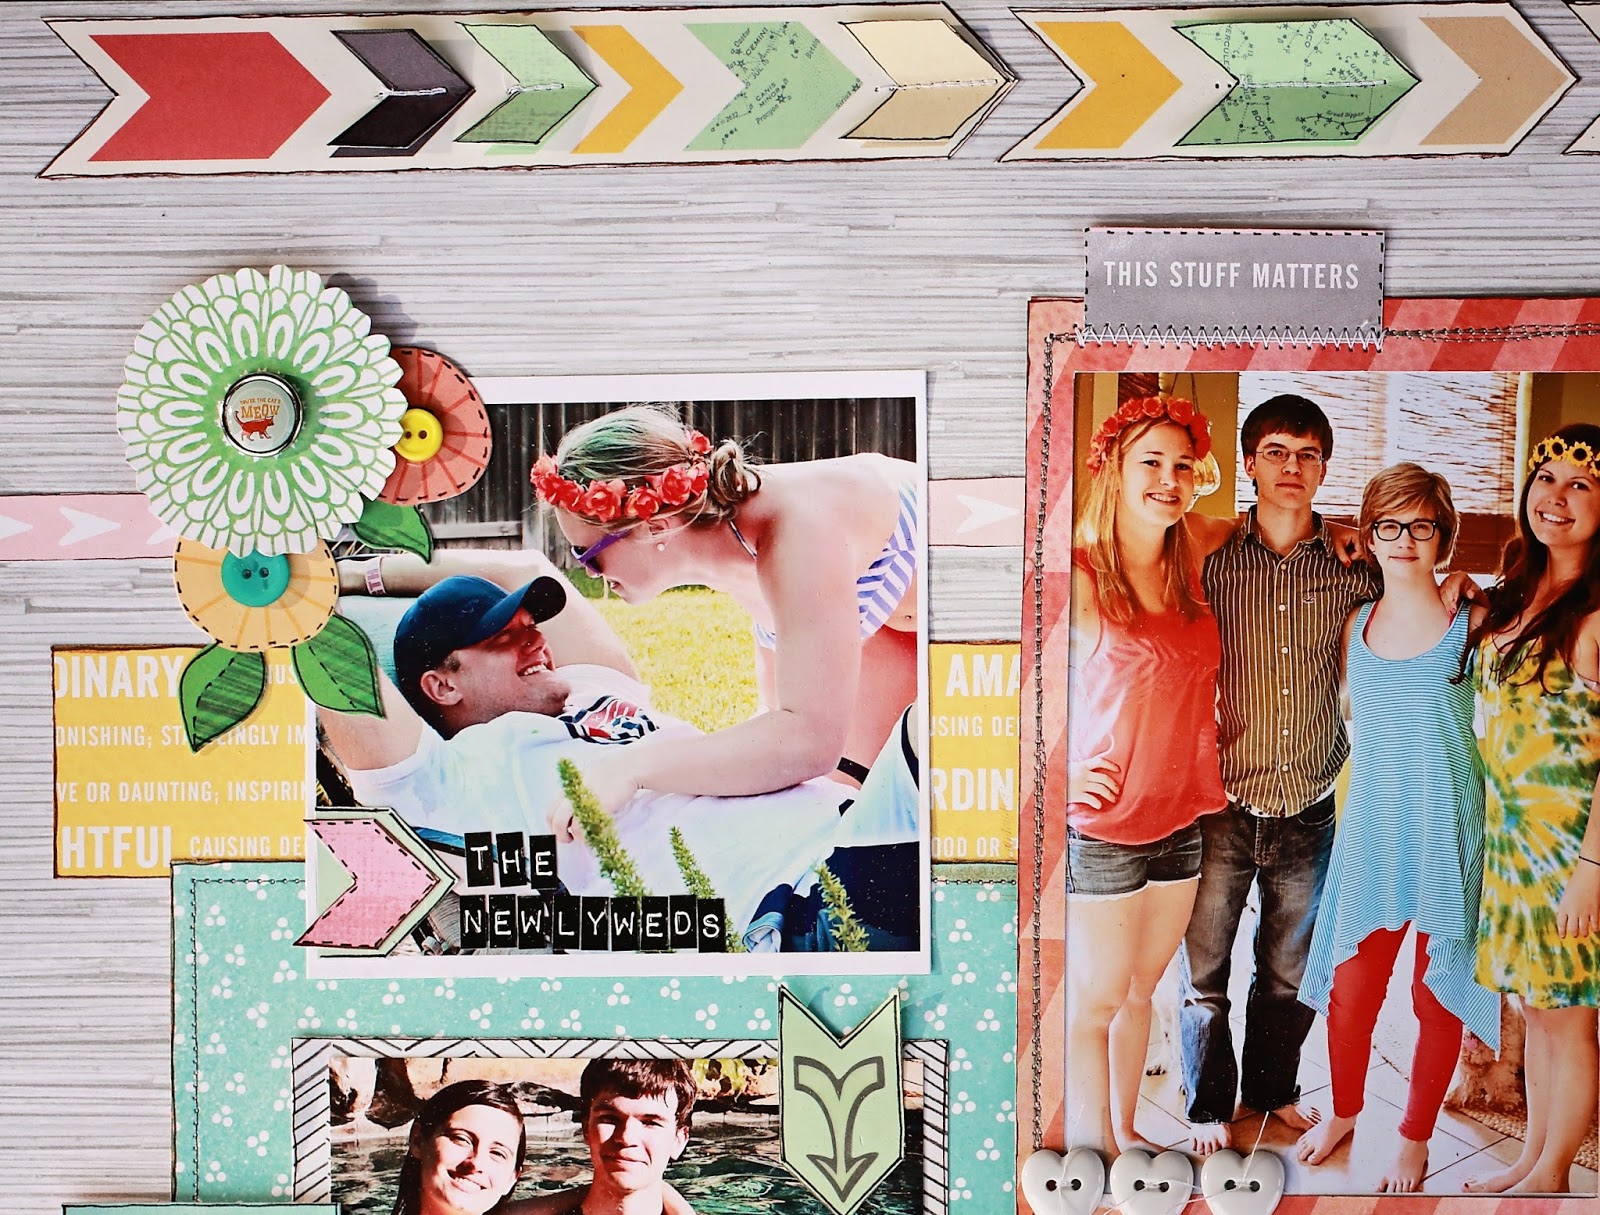
Part of the MME sketch challenge was to use arrows, so I made sure I included several of those in my layout, too.
 
That's it for me today.  Be sure to come back tomorrow to see a new reveal and to find out who has won prizes from this past weekend's blog hop!!!

Friday, June 28, 2013

Project Life Blog Hop

Hello and welcome to the PRACTICALSCRAPPERS and SCRAPTOWN LADY Blog Hop!  We thought it would be fun to combine forces and share projects with you that have our design teams’ takes on one of the hottest scrapbooking trends around:  Project Life. 

Whether you are a “Project Lifer,” are interested in Project Life, or just want to find out ways to use all those fantastic Project Life types of products and ideas on your own projects, we have a hop FULL of inspiration and creativity! 

We’ve got a fabulous prize, too - a $25 gift certificate to Scraptown Lady’s shop, which is stocked with awesome scrapbooking supplies!  What do you have to do to be entered in the drawing?  It’s easy! 

1.      Be a follower of Practical Scrappers; and
2.      Be a follower of Scraptown Lady; and
3.      Visit all the blogs, starting with Practical Scrappers and ending with Scraptown Lady, and   leave a comment at each blog along the way.  

We will be hopping until Sunday, June 30th at 11:59 p.m. CST.  The grand prize winner will be announced on Tuesday, July 2nd! 

 If you get lost along the way, just check the complete list below to get you hopping in the right direction:

 Practical Scrappers: http://www.practicalscrappers.com/
Christine Freet Meyer: http://scrappingwithchristine.blogspot.com/
Erin Morehouse-Kislingbury: http://girlpaperscissors.blogspot.com/
Charissa Miller:  http://www.akihasmommascraps.com/
Nicole Laha: http://www.shezigzags.blogspot.com/
Claude Campeau: http://www.imzadi481.blogspot.ca/
Lanette Erickson: http://stacksofscraps.blogspot.com/
Malika Kelly: http://www.malikakelly.blogspot.com/
Danielle de Konink: http://picsandcheesecake.blogspot.nl/
Lisa Peeples: http://www.snappinandscrappin.blogspot.com/
Mary Pat Siehl: http://siehledwithakiss.blogspot.com/
Wendi Robinson: http://scrappydayinparadise.blogspot.com/
Julie Comeau: http://lepetitmondedeglamotte.blogspot.ca/
Kim Ryden: http://www.rydenkim.blogspot.com/
Ruth Bonser: http://scrapmachine.com/
Krissy Clark McKee: http://krissyclarkmckee.blogspot.com/  That's me!
Marcia Dehn-Nix: http://onescrapatatime-bymumsie.blogspot.com/
Cathy Harper: http://www.alteredplayground.blogspot.com
Rhonda Van Ginkel: http://snapwhiz.blogspot.com/
Scraptown Lady:  http://scrap-town-lady.blogspot.com/

 If we have inspired you so much that you “need” to do a little shopping now, SCRAPTOWN LADY is offering 20% off all orders during the hop!  The sale runs from now ‘til midnight Monday.  Enter “code20” to receive your discount.
 
And, as an extra prize, if you start following my blog and leave a comment, you will also be eligible to win a free project life online class with my dear friend, the amazingly talented LISA WILKINSON.  An example of her wonderful work can be found HERE.
 
Now, for my take on Project Life....well...er, the whole keeping up with a year long project every.single.week. was a bit intimidating to me.  But, what I decided I DID want to do, was keep a small journal-type scrapbook with all of the (numerous) INSTAGRAM pictures I take that usually end up sitting on my phone forever and ever.  Using a smaller SNAP album and having a quick way to document the stories behind my day-to-day Instagram photos was very appealing to me, so that is what I have begun to do.  This is my start; let me know what you think:

So far, I have used a combination of AMERICAN CRAFTS and PRETTY LITTLE STUDIO papers.  Why?  Because they were already on my work table and I had lots of scrap pieces sitting out - perfect for a smaller format like this!


Because this is my "everyday" album, full of my "everyday" thoughts - I have committed myself to journaling about them all - the good, the bad, and the ugly!  Kind of scary, but also liberating in a way.  And if I don't want anyone else to see it, I'll just put it on a pretty tag and stick it in a pocket.  That makes everything better, right?!  Right!!! (For the record, though, the journaling on this tag was quite happy - just saying!)


I love using random left-over bits and incorporating them into several pages - something I also tend to do with my 12x12 layouts.


That's it for me!  Ready for more inspiration?  Okay!  Your next stop is: 
Marcia Dehn-Nix: http://onescrapatatime-bymumsie.blogspot.com/

Happy hopping!!!
 

Tuesday, June 25, 2013

Playing with Pebbles (Sketchy Thursday)

I know I have said this at least a hundred and five times but...wait for it...I LOVE sketches!!!  And when I saw the BECKY FLECK sketch up at PEBBLES for Sketchy Thursday, it was definitely love at first sight!  So, I raided my Pebbles stash and created this layout from a combination of the Seen and Noted, Sunnyside, and Basics collections. 

This picture is the ONLY one I took on little Huntie's 13th birthday!  Such a big banner day and she only got one photo (a fact that she is most likely immensely thankful for!)  But in my rush to get out of the house and get Huntie and her bestie to the water park, I forgot my camera.  And since cell phones and water are not a good combination, this one lone shot away from any H20 was as good as it got.  But the layout captures the mood of the day and I have a very detailed letter to my daughter added to the back of this.  And we had FUN, which is what birthday celebrations are all about!
 
I am really pleased with my clouds and sun, which I created with my Silhouette Cameo.


I did a little stamping across my clouds to match my stamp-turned-splatter that I "deliberately" created in the background (you totally believe me, don't you???)  And I machine-stitched around my sun (this time it really was deliberately messy, I promise) to add a little bit of movement and fun to my layout.  Pop dots to add dimension behind a cloud and my "hello" were the perfect finishing touches.

 
I love this cluster - it's not too much and not too little but j-u-u-s-s-t right.  I used flower stickers, with pop dots behind the two smaller ones; a life is good sentiment cut out from a sheet of banners and sentiments in the Sunnyside collection; and a large journaling tag that anchors the entire cluster down.  My 13 was quickly cut out using my Silhouette.  Because I used so much white in this layout, I accented everything with doodling to help it stand out.
 
That's it for me today - but stay tuned!  A Pretty Little Studio project and a Practical Scrappers Blog Hop (with a cool grand prize) are headed your way!!!

Monday, June 24, 2013

Getting Fussy with my Scissors (Practical Scrappers)

 
Today at PRACTICAL SCRAPPERS, our On Trend team is showing everyone how we get fussy.  No, we aren't having a rant over there, we are showing off our layouts and cards in which we used a technique called "fussy cutting."  What exactly IS fussy cutting?  I think the best, easiest way to describe it is how diecuts are made without a diecutting machine - like a Silhouette Cameo.  You see an image or shape you like on a piece of paper and you cut it out to add to your layout or project.  It's that simple!

Often, when crafters think about fussy cutting, we think of projects using what I call "image rich" papers (yes, I just now coined that term - feel free to quote me!) - Graphic 45 and Websters are two of the big names who design these types of papers.  But fussy cutting isn't only limited to cutting out elaborate, detailed images; it can be as simple as cutting out chevrons from a patterned paper you like to make and accent your embellishments, like I did in this layout using a combination of AMERICAN CRAFTS papers from the Yes, Please and Lucky Charm collections.  I took this paper:


...and I cut right outside the outline of several chevrons to create my arrows.  I then cut out individual chevrons and layered them on top of matching ones on my arrows by machine stitching them along the center line so that I ended up with this:


And, as you can see, because I loved my chevron arrows so much, I also used them as accents to draw attention to several of the individual photos - quick and easy embellishments that only required scissors and paper!

Of course, I did use my Silhouette, too, to make this adorable bicycle (which I embellished with buttons, a fabric heart sticker, and my bicycle flag made from twine and a hand made pennant).


...and to make this frame.  It was originally a polaroid frame that I elongated to fit my 4x6 photo.  I adhered different scraps of my AC papers behind each of my letters to make it extra-colorful.


Before I go, I wanted to leave a few tips for fussy cutting:

1.  Sharp scissors are an absolute MUST.  If your scissors aren't sharp, you will often end up with a frayed edge that looks a little "chewed up" by your scissors.  Fraying and distressing are good but NOT when you are fussy cutting!
 
2.  Maybe it's because I have small hands, but smaller scissors generally work better for fussy cutting.  They allow you to maneuver your scissors more easily when cutting out a shape, especially more intricate shapes.
 
3.  To keep your fingers from cramping and feeling like you will never be able to fully straighten them out again (especially if you are cutting out an intricate shape or lots of shapes), I highly recommend getting spring-loaded scissors, such as these, which can be found in most craft and sewing stores. 
 
 
That's it for me today.  But you know I'll be back - I've got some Pretty Little Studio and a blog hop in the works, so stay tuned!

Thursday, June 20, 2013

Using Feathers - Pretty Little Studio


I will tell you a little secret - sometimes I am scared to try new things.  Even with scrapbooking.  Crazy, right?  Especially since I pride myself on trying out and staying on top of all the latest trends.  But the trend with feathers, even die cut feathers?  We-e-e-l-l-l...I wasn't too sure about that one.  Oh sure, I have seen some really cute things done with them but I have also seen some projects that I did not care for at all.  So, I wasn't entirely sure feathers were for me - even though I had not actually tried working with them yet.  (I can still hear my Grandmama at the dinner table asking me, "How do you know you don't like it if you haven't even tried it?") So...the point of this long intro is to say that I was a little anxious but mostly relieved to see this week's inspiration ad challenge at PRETTY LITTLE STUDIO that featured lots and lots of feathers.  It was time for me to pull out my feather die cuts from the brand spanking new NATURE WALK COLLECTION and put them to use on a layout! 
 
Wanna see a close-up of those feathers that I was so frightened to use?  Here they are:
 
 
So....yeah, they were absolutely perfect for this layout of my Kelly and his little girl Lula, and they look great!!!  They provided the accents I wanted around this photo without being too girly, although I am sure they would work just as well in a girl's layout.  Because they are diecuts, they lay perfectly flat and were easy-peasy to layer behind and against the fringed edge of my paper frame.  I left the ends of my thread from my sewn border long and uncut and tied it around the tops of my feathers.  (Note: the arrow that you see was a leftover scrap on my work table from American Crafts; but it coordinated so beautifully with the papers on my layout that I decided to sneak it in - shhhhh, don't tell anyone!)
 
Besides the feathers, this border is one of my favorite parts of this layout!
 
 
I did lots and lots of fussy cutting with my Pretty Little Studio Papers and tags, which is one of my favorite things to do!  First, I cut the triangles out of my paper and set them close together, but not flush with each other, to creat a mosaic look.  The bunting flags were created from a journaling calendar card and scraps left over from the fringed frame around my photo.  I simply used an existing flag from my PLS collection as a template to trace and cut out these. 
 
That's it for me today, but be sure to head over to the PRETTY LITTLE STUDIO BLOG to see this week's ad insipiration and, while you are there, check out all the lovely new 12x12 papers, journaling cards, and crazy cute die cuts (including fantastic die cut feathers)  that are in the STORE!
 
And if you want to see the Becky Fleck sketch that I used to create this layout, click HERE.
 
(Psssttt - how do you feel about feathers?  Is there a new trend that you have been afraid to try out?)
 

Wednesday, June 19, 2013

A Nautical Layout - Practical Scrappers


Ahoy mateys!  I am catching up with a layout I should have posted last week.  Arrrggghhh - where has the time gone?  I feel like I have been stranded on a desert island with Gilligan's castaways, only my "island" is a tall office building that I got shipwrecked on after setting sail on the SS J-O-B!  But enough whining about the 9 to 5 routine, I obviously enjoy it or I wouldn't still be there.  And it does pay for my nifty scrapbooking supplies, like the wonderful Down by the Shore Collection by FANCY PANTS DESIGNS, which was perfect for this layout inspired by an instagram photo my oldest bebe sent to me.
 
I used my Silhouette to create the chevron cut paper behind my photo.  I then sewed a couple of the cut chevrons to the bottom of my layout and added bits of confetti that were still laying on my workspace from an earlier project.  They remind me of a spray of water, and I like the way these and my mist splatters help to fill up the space on my layout without making it feel cluttered. 
 
 
I also L-O-V-E the ephemera that Fancy Pants created for this line! Little pieces like these paper clips and brads are exactly what I tend to use most on my layouts. I added clouds (again cut with my Silhouette), a few buttons, and a piece of twine - and my clusters around my photo were j-u-u-s-s-t right.
 
 
That's it for me.  Want more nautical layouts?  Simply click here to see what inspiration other PRACTICAL SCRAPPERS have for you!
 
(Pssst - want to make my day?  It's easy - leave a comment!  I would love to hear from you!)

Tuesday, June 4, 2013

SKETCH TIME - PRETTY LITTLE STUDIO


Happy Tuesday!  We are another day closer to the weekend and, for me, one day closer to having a little free time to sit down and play with my scrapbook supplies.  We've got a sweet sketch posted over at PRETTY LITTLE STUDIO that will help kick-start your crafty mojo - it's nice and simple so you can interpret it any way you want - whether you take a clean and simple approach or want to use an entire paper and matching ephemera collection.

My layout is somewhere in the middle of clean and simple and everything-but-the-kitchen-sink.  I did add lots of pieces to it, but I kept them small and layered many of them so it doesn't feel quite so busy.

I love these little thought bubbles by PRETTY LITTLE STUDIO
When your tween is giving you a "look" that speaks volumes to you but maybe not so much to Aunt Gerta in Idaho, you can use these bubbles to translate what your child would be verbally telling you if you were actually cool enough to talk to.  LOL!  Of course, they can also be used for journaling.

To see this week's sketch and more inspiration, go check out the PLS BLOG - right now!!!  Do it!  Don't make me have to roll my eyes and start pouting...

Monday, June 3, 2013

MAKING A PIECE OF THE PIE - PIE CHARTS


Today over at PRACTICAL SCRAPPERS, the On Trend Team members (including me) are showing off our pies - charts that is.  The perfect thing to make pie charts with are scrap pieces of paper.  And since I had lots of scrap papers that I had been hoarding saving from my PRETTY LITTLE STUDIO collections (and I had a project due), I decided to multi-task and use my Pretty Little Studio scrap papers to create my pie-chart for Practical Scrappers.  It's a win-win!

Want to know how to make a pie chart?  I have a quick step-by-step tutorial to walk you through it on the Pretty Little Studio BLOG.  And, of course, for other inspirational pie charts, check out Practical Scrappers.

A few close-ups and I am out of here until tomorrow, when it will be time to reveal the new PLS sketch (and my take on it).  It's another good one!