Showing posts with label machine stitching. Show all posts

Wednesday, March 27, 2013

Happy Hearts (Practical Scrappers)

 
Who's happy today?  I am!  Why?  Because PRACTICAL SCRAPPERS has a new sketch reveal by Liz Chidester that is featured on today's blog!  And if that isn't enough to get you motivated, I think all the wonderful layouts we girls created are sure to inspire you!  (If I do say so myself)
 
I LOVED this month's sketch, even though I didn't follow it exactly - and that's okay because it means that I can play with it again!  Here is my layout, featuring my baby boy and his favorite gal (besides his mama):


I used wonderful papers by AMERICAN CRAFTS - I am loving evey single one of their new collections that have been released recently.  I cut out my background shaped heart paper using my Silhouette and then sewed and glued the leftover hearts on my stitched circle. 
 
 
I also L-O-V-E-D these vellum hearts that I found at Archiver's a few weeks ago.  More heart shapes from my background "heart paper" were glued on the little arrow at the bottom of this picture.
 
Thanks for stopping by!  That's it for me today, but be sure to head over to PRACTICAL SCRAPPERS and leave a little love!  And, of course, you can ALWAYS leave a little love for me here, too!

Saturday, March 9, 2013

Perfectly Imperfect - Using a Less Than Perfect Photo

Happy Saturday!  I hope you are all having a wonderful day - relaxing, crafting, organizing - whatever you are doing.  I am sharing a layout that, with my busy couple of weeks, I COMPLETELY FORGOT to post!  PAPER SECRETS does a monthly challenge, which includes a great sketch with a twist.  The twist last month - to use banners, which is totally one of my favorite things to do!
 
I found this picture of Hunter that I took a month ago.  She was laying on her bed talking and joking with me. I only took one shot, and it ended up being a little out of focus - but I loved it because it reminded me of a perfect moment with my daughter.  So I decided to use it anyway - a less than perfect picture that I love about my perfectly less than perfect daughter whom I love dearly (clearly taken by a less than perfect mom/photographer!).  I used wonderful PEBBLES papers from the Seen and Noted Collection, which are so bright and cheerful and perfect for a layout about my favorite tween!

My title/journaling was mainly hand written strips of paper which were cut out and outlined in marker. 

 
I machine stitched just about every place possible on this layout - and what I didn't machine stitch, I doodled on.


That's it for me, today.  Be sure to stay tuned as I expect a rare sighting of a Krissy Clark McKee two-page layout to make an appearance next week!

Thursday, February 14, 2013

My Valentine (Practical Scrappers)


Happy Valentine's Day!!!  Today at PRACTICAL SCRAPPERS we are sharing our Pinterest inspired Valentine Projects.  I have been saving so many cool layouts that inspire me on Pinterest that this was the perfect opportunity to do something I haven't had the fun of doing in a long time - a lift!  And not just any lift but a lift by an artist that I L-O-V-E, MAGGIE HOLMES!  I lifted this fantastic layout (did I mention I love, love, love it?):

Like the original artist, I used STUDIO CALICO papers - although I am not a member of their kit club and bought mine from a scrapbook store.
 
My layout is about my honey-bunny, who is my very favorite valentine.  I thought the travel papers were perfect for my Maya Angelou quote, and I loved creating a layout that did not use the traditional Valentine pinks and reds.  Don't get me wrong, I've got nothing against the traditional colors, but my unique guy deserved something a little less...ordinary, for lack of a better word.
 
Here are some close-ups (oohing and aahing not required but always appreciated!):

My hearts were cut out using my Silhouette (of course), and I outlined them all with a black fine-tip marker.


I only glued the middle section of some of my hearts so the edges could be lifted up to add more dimension.
 
Got to have a cluster around the picture - got ta'!
 
Annnddd, I stitched all around my "earth" and added tiny brads and the stars from my punched background.

That's it for me, but head on over to PRACTICAL SCRAPPERS to see how the rest of the girls were inspired on this Day of Love!

Wednesday, February 13, 2013

Live Inspired - A Practical Scrappers Sketch Reveal


Today over at PRACTICAL SCRAPPERS, we have the February sketch reveal and it is another fantastic one by our Practical Scrapper, Liz Chidester!  I love her sketch, but I decided it worked better with my papers and picture if I flipped the sketch upside down and mirrored it.  Whatever direction her sketch is turned, it is fantastic!

I used a picture that I love of "my boys" taken in December along with some artsy, wonderful STUDIO CALICO papers from a couple of different collections.  I love their bold, graphic style and thought it really suited this photo of these guys doing their "inspirational album cover pose" - especially since the clouds on the background paper seemed like an extension of the sky in my photo.
 
The top right corner of the paper had several blue lines that, to me, looked like the rays of the sun (yes, even though they were blue).  So, I layered and extended those with leftover strips of paper that I machine stitched in contrasting orange.  I printed out this great Silhouette quote four times in teeny-tiny letters and further accented each "ray of sun" with bright shiny gold stars, also from Studio Calico.


I added a couple of punched clouds that I randomly machine stitched across to help connect the clouds on the background paper to my picture. 

My journaling extended across the bottom half of my page, from here:


to here:
 
Liz's sketch certainly inspired me this week!  Why don't you print it out and give it a try?  And if you do, feel free to leave me a comment with a link to YOUR layout (and link it on Practical Scrappers, too!) - I would love to admire what you have created!
 
Until this time tomorrow (when I show you a Valentine's layout in non-Valentine colors), happy scrapping!

Monday, February 11, 2013

Happy Girls Layout - Using Crate Paper

Happy Monday morning everyone!  With Valentine's Day right around the corner, I have really been focused on the people and things I love - and scrapbooking all about them, of course!  And some of my favorite papers to use have been from CRATE PAPER'S 14 COLLECTION, which is defintely on my TOP 5 Paper Collections List right now.  The papers are saturated with color and a little bit vintage-y and absolutely perfect for layouts such as this one featuring my sweet, lovely daughters! 
 
As my starting point, I used this fantastic sketch from CREATIVE SCRAPPERS.  Seriously, Kristine's crew comes up with so many awesome sketches, I don't know when I will have time to get to them all!
 
Let me tell you a little bit about this layout - because I had so much fun making it!
 
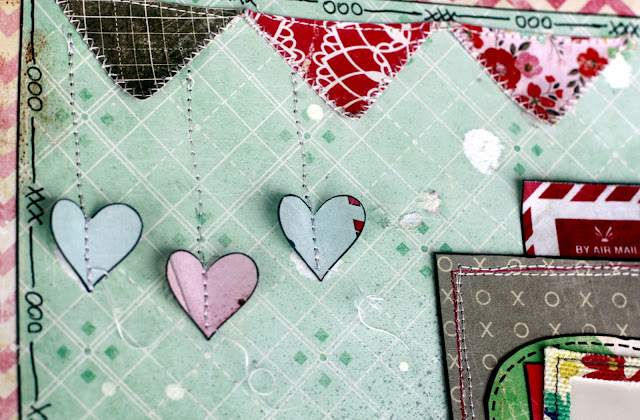
First, this banner was fussy cut directly from a page of - you guessed it - banners!  I just cut a few out and zig zag stitched around my pieces, then sewed them across the top directly onto my layout.  I initially had a second, different banner making a larger swoop below this one but decided it made my layout too busy - after I had already glued it down to my papers, of course!  So, I ripped the second banner off, sewed these little hearts on top of a few of the ripped areas, and decided that the other visible tears in my papers were extra distressing that I MEANT to have on my layout - hahahahaha!  Besides, they compliment my white paint spatters that really were put there on purpose.  (Yes, I am the Queen of Rationalization - that's how I am able to continue buying new scrapbook papers when I will never use up all the ones I already have.)  I left the threads at the end of my hearts long and uncut because I liked the way they looked.
 

I used one of the polaroid frames from a newer MAGGIE HOLMES' Collection (I LOVE her work!)  Obviously, my picture is not square-shaped and not meant to fit in a polaroid frame.  But I wanted to use it so I just angled it across the top as an accent.  The number blocks were originally part of a border strip on one of the 14 Collection papers that I simply cut up, outlined, and pop-dotted on my frame. 
 

Here is another view of the center of my layout and one of the reasons why I chose the Creative Scrappers sketch that I used - LAYERS!!!!!!  I love the layers!  And look how scrumptious these papers look together - almost good enough to eat!  Okay, not really, but these papers ARE perfect for layering...and for sewing on!
 
 
My title, "Happy Girls are the Prettiest Girls" is part of a fabulous quote by Audrey Hepburn.  It's overused now, but I still love it anyway!  And, like my papers, it was perfect for this layout.  I used my Silhouette Cameo to cut out those small letters.  I also cut out a few of the negative outlines left over and used those in place of the letters.


And speaking of my Silhouette, I love using it and my small scraps of leftover paper to make little extra things like this tab that I added to my layout. "Waste not, want not," as my Grandmama used to say.  And what a super cute way to make sure my paper isn't wasted!


Last, but not least, is the bottom of my layout.  I didn't have quite enough of the green and white striped paper I wanted to use and I didn't like my picture just hanging off the bottom of my layered papers, so I took some of the thin cut-out strips and placed those under my picture to give the "suggestion" of a continued background paper. 


That's it for me today.  Hope you are staying dry and warm whereever you are!

Monday, January 14, 2013

These Are the Days

Happy Monday! It is the typical gloomy, rainy Monday here that definitely makes me want to stay in my jammies and not leave my house for any reason. But - I had to brave the traffic and head in to the 9-to-5 that pays the bills - and more importantly, that pays for all my scrappy goodies! So, I figured if I can't see the sunshine, I can be the sunshine (Man, I should market that). That's right, I am going to be happy and cheerful today if it KILLS me (and it just might).  
 
Speaking of happy and cheerful, something that is guaranteed to put a smile on my face is these two girls. Little Lula has learned how to tell Knock-Knock jokes and she was clearly cracking herself up in this picture! The Huntress kept looking over at me and rolling her eyes at the "silliness" of it all (as if she weren't a 3-year-old herself just the other day), but she was clearly having a good time! I put this layout together using a great sketch found over at LET'S CAPTURE OUR MEMORIES. I like it so much that I already have plans to use it again (which is very unusual for me). My papers are a combination of ECHO PARK'S Sweet Day, Everyday Eclectic, and maybe another EP collection thrown in for good measure. Why did I use so many collections and patterns, you ask? Why, because I was playing along with the Cha '13 Online Winter Social Challenges found over at the TWO PEAS site. You know me - can't so no to a good challenge, and this one to use 7 different patterned papers was no exception! Want to see a few close-ups? 
 
Journaling and title combined (one of my very favorite things to do lately):

I liked this ribbon-flower-thingy embellishment, except the banners weren't the right color and I didn't like the little picture on the front. But I really did like it - really!  So - I made a few changes and embellished my embellishment - ha!

I may have stuck with EP for my papers, but October Afternoon and American Crafts made their way onto my layout via their wonderful bits and pieces that I had to use!

And, finally, my stars...which have machine stitching going across them because I am a machine-stitching junkie! (But I can stop any time I want! I just don't want to right now.)

And that's it for me today. I truly hope I have managed to brighten YOUR day - if only a little bit.


Wednesday, May 30, 2012

Celebrating One of My Favorite Things with Practical Scrappers


I will let you in on a little secret.  Today is my birthday.  Yippee!!!  And what better way to celebrate than by showing you one of my very favorite things to do on a layout.  What is it?  Can you guess?  It's machine stitching!  And PRACTICAL SCRAPPERS chose today, of all days, to do a post on machine-stitched layouts.  Coincidence?  I think not!  So, of course, I contributed with this layout, on which I machine stitched just about anything that could possibly move.  And the little pieces (like the diamond-shaped pieces of paper) that I was too lazy were too little to be easily stitched - I just doodled around those edges so they would look stitched, too.

To get started, I used a wonderful sketch by the very talented Amaryllis found over at SCRAP THAT, a kit club where my bestie, ALISSA, is a design team member.  Papers are from Pink Paislee's Prairie Hill Collection, and my shaped papers were cut out using my Silhouette.  The picture you see?  It is one of my second daughter's engagement photos that I am totally in love with!  Let me warn you, there are about 50 more pictures from her engagement shoot that I am also "totally in love with" so you will be seeing quite a few more!  So gird your loins! (ha! - I love using that phrase)

I love the pops of color this cluster of flower adds.  They are by Basic Grey, but I thought they worked quite well with this layout.


Machine sewing across chipboard alphas is a great look, I think.  Don't be afraid, your sewing machine should be able to handle it quite easily as long as you go slowly.


I love adding a zig zag stitch as a way of defining my border near the edges of my layout.  Smaller pieces of paper use a simple straight stitch - sometimes once around and sometimes twice around the paper - almost always deliberately NOT straight, because I like the "messy" look it provides.  You can see that my small diamond shapes have doodling in brown marker that matches the thread I used in my machine stitching.  Even my photo has a zig zag stitch going across it as an accent (and to hold my twine in place).

Layers + stitching = LOVE!!!


That's all for today.  Now, I am off to have breakfast with my oldest "babies" but, before I go, I wanted to leave my birthday wish for YOU.  Celebrate life.  Celebrate it every day.  Document it.  LIVE it.  Enjoy the beauty and the wonder and the excitement (and even the uncertainty) that is each new day.  I love you all and look forward to spending my next year with you!

Hugs and Kisses!

Monday, May 21, 2012

A Challenging Weekend


This weekend, I made sure that I took time out from the laundry and the grocery shopping and the house cleaning to have a little crafty me time.  I love challenges, and BIRDS OF A FEATHER had a couple that really caught my interest.  First, I completed the Scraplift Challenge.  Now, for those of you who don't know, a scraplift is where you take another person's layout and, basically, copy it as much or as little as you like.  When I was just starting out and trying to figure out "my style" and learning different techniques, I did a lot of scraplifting.  It was the perfect way to teach myself how to get an end result that I liked.  Today, it's still fun to occasionally find a design I like and make it my own.  The best part - like most things in scrapbooking, there is no right or wrong way to scraplift.  The ONLY hard and fast rule - give credit to your source of inspiration!

I chose to lift a layout by the very talented Lisa Wilkinson, which can be found HERE.  I chose Lisa's layout because, like me, she loves to incorporate lots of layers and bits of randomness here and there.  She definitely speaks my scrappy language!  I chose some wonderful new Heidi Swapp papers from her Sugar Chic collection and lots of bits and piecesfound on my always messy work table.  The picture is of my second daughter flexing her beautiful muscles.  Her strength and determination is always an inspiration to me so I thought this picture was perfect for a layout - even if you don't see her face.  The paint is, partly, a happy accident that I was trying to clean up.  I just took a deep breath, convinced myself that messes can be a good thing, and went with it. 


I like the look the two different "fonts" of letter stickers together.  What do you think?

I just kept adding different layers here and there to get my final look.  I stitched and doodled on some layers, and I added pop-dots under others to give emphasis.  And see what I mean about randomness from my messy table?  I see things from at least five different manufacturers on this close-up!

Well, that's it for tonight.  Stay-tuned - tomorrow I will be back with my second layout from this weekend, and I can't WAIT to show it to you!