Showing posts with label american crafts. Show all posts

Thursday, May 29, 2014

May Scrap Our Stash Blog Hop


Happy Friday - I am so glad you are hopping along with us to get the weekend kick-started!  You should have arrived here from CHERYL'S BLOG.  If you are just stopping by and want to start at the beginning of the hop, head over to PRACTICAL SCRAPPERS.

I have two confessions to make to you while you are here.  The first is, today is my birthday!  And I think that being involved in a blog hop with my good friends is the perfect start to the beginning of my *cough mumble mumble cough* year.  LOL!

My second confession involves my layout, which is really, really (really) bright; however, after several days of heavy downpours and dark gray skies, I needed some bright sun, even if it only came from my paper stash:


You may be saying, "Krissy, this is a new(ish) summer collection by AMERICAN CRAFTS.  How could you possibly consider this to be scrapping your stash, which is kind of the point of the whole blog hop?"  Okay...time for confession two.  You see, through a stroke of sheer luck, I managed to score these papers way back during CHA in January.  Then, well, life happened (in ways that I would have preferred it not to have done) any my scrapbooking goodies got shoved in a bag under a table, where they sat alone and neglected.  Do I have older stash?  Oh, yes.  But I am positive I don't have anything brighter and more sunshiny than these papers!

To get started, I used this sketch by CREATIVE SCRAPPERS:


As you can see, I stayed pretty true to the sketch.  Here are a few close-ups (go ahead, put on your sunglasses if you need to):


As you can see, I was one layering crazy woman!  But what can I say?  I wanted to use all my bright pretty papers.  And then I found some cool transparancies that I HAD to use; and the same with the cute stickers; and, gosh, how could I NOT use the adorable wood veneer shapes?  

And, of course, I had to include a little flair.  And include tiny type stickers to add a little visual interest to my title.  And sew.  And fussy cut.  And cut fringes...


But - my stash is just a little more scrapped now, and my work here is done.  Or at least my layout is done...you know what I mean...

Next up on the blog hop is WENDI.  I am sure you are going to love her project!  

Have a great weekend and happy hopping!

Monday, March 3, 2014

Pebbles Garden Party Guest Design!!!


Today's the day - it's finally here!  Is it Christmas again already? Not exactly - although that is what it feels like for me!  Today is the reveal day for Garden Party on the PEBBLES BLOG, and guess who the featured guest designer is?  Me-e-e-e-e-e-e-e-e-!!!!!!!!!!!  I've got to tell you, that is the best way to start off a Monday - ever!

Now, I'm not going to do a lot of talking in this post (because I have three projects to show you), except to tell you that the GARDEN PARTY COLLECTION is every bit as fresh and bright and pretty as it sounds!  The Pebbles patterns always mix and match well, making layering (and layering and more layering) easy-breezy, and Garden Party is no exception.  The hardest part of each project for me was choosing which papers I was going to use because they ALL look perfect together!  

Without further ado, here are my Pebbles Garden Party projects:

First is my layout - spring flowers aren't the only things blooming around here!  My 13 year old daughter is suddenly starting to look like a young woman, so this spring collection was just what I needed to create a layout about her.


Yep, I layered my little heart out!  I love adding bits of symbolism to my layouts, and the self-adhesive BUTTERFLY and "tweet" bird were perfect!  And I have to tell you, the glittery foam THICKERS that I used for my title are some of the prettiest I have seen yet.

Here are a few close-ups:


For my second project, I chose to do a Project Life layout.  I have just discovered Project Life and am really loving it now that I have things somewhat figured out.  Pebbles creates wonderful journaling cards, but I wanted to show that you can also cut up your regular papers and use them for Project Life spreads, too!  


Of course, I've got that little layering obsession so lots of things seem to end up attached to the tops of my pockets rather than in them!  Repeat after me - there is no wrong way to scrapbook.  And the journaling POCKETS WITH INSERTS and MINI ENVELOPES  were so unbelievably adorable (and functional) that I couldn't resist!  Just look at how cute these are:


So....what do you do when you have one extra pocket left over with nothing to put in it?  Well, if you are me, you fill that space with several pretty vellum and adhesive FLOWERS.  Why?  Because they are pretty.  And I like pretty things. *smile*


Did I machine stitch over that pocket so that the back side cannot be used?  Um, yes.  Yes I did.

Finally, my third project, which was created with the help of my handy-dandy Silhouette Cameo.  I made a spring purse with packets full of sweet treats to give away to little ones at a recent party.  Seriously, is this not the cutest way to bring little treat bags to a party?!


I created my treat bags by starting with this PEONY PAPER, which I cut up and sewed to my other patterned papers.  The Garden Party PHRASE AND ACCENT STICKERS and MINI-CLOTHESPINS dressed my little bags up beautifully!


Have I mentioned how much I love layering?  I have, haven't I???


Whew!  That's it for me.  I hope you have enjoyed these projects and, if you have, let the ladies over at the Pebbles BLOG know what you think!

Monday, September 30, 2013

Remember These Moments


Despite still being drugged up medicated from my recent yanking out of the wisdom teeth, I wanted to do a little something with all my yummy scrapbook supplies - including some recent American Crafts loot that I picked up.  They were getting lonely without me!  My creativity, however, needed a serious jump-starting.  I think Hydrocodone stands for hydro-can't-come-up-with-a-thought-of-you-own.  So, I found a challenge and a sketch to get me back on track.
 
First, the challenge (to be said in a totally exaggerated fake French accent - "zee shal-awnge"):  I decided to play along with the TWO PEAS CHALLENGE to write directly on your photo.  I normally would have cropped this photo of the Huntress a little closer; however, I realized if I left it uncropped, I had the perfect amount of space to write my journaling and complete - c'mon, say it with me ZEE SHAL-AWNGE!
 
Second, the sketch:  Good old PAGE MAPS is always a win for me.  I took one of the SEPTEMBER CHALLENGES, rotated it just for fun, and used one large photo instead of three.  I will let YOU figure out which sketch I used!
 
Close-ups?  Want to see a close-up or three?  Well, here you go!

Here is the writing on the wall, or...er...the picture....

Of course, I had to include this little doggy sticker since my daughter had been playing in the pool with her own little doggy...

And, finally, what do you do when you run out of room on your photo and decide that you want to journal even more?  If you are me, you create a pocket and insert a card that holds extra journaling.  Since I am me, that is exactly what I did!  See?

That's all for me today.  Hope you have a Happy Monday - only five more days until the weekend is here!!!

Friday, June 28, 2013

Project Life Blog Hop

Hello and welcome to the PRACTICALSCRAPPERS and SCRAPTOWN LADY Blog Hop!  We thought it would be fun to combine forces and share projects with you that have our design teams’ takes on one of the hottest scrapbooking trends around:  Project Life. 

Whether you are a “Project Lifer,” are interested in Project Life, or just want to find out ways to use all those fantastic Project Life types of products and ideas on your own projects, we have a hop FULL of inspiration and creativity! 

We’ve got a fabulous prize, too - a $25 gift certificate to Scraptown Lady’s shop, which is stocked with awesome scrapbooking supplies!  What do you have to do to be entered in the drawing?  It’s easy! 

1.      Be a follower of Practical Scrappers; and
2.      Be a follower of Scraptown Lady; and
3.      Visit all the blogs, starting with Practical Scrappers and ending with Scraptown Lady, and   leave a comment at each blog along the way.  

We will be hopping until Sunday, June 30th at 11:59 p.m. CST.  The grand prize winner will be announced on Tuesday, July 2nd! 

 If you get lost along the way, just check the complete list below to get you hopping in the right direction:

 Practical Scrappers: http://www.practicalscrappers.com/
Christine Freet Meyer: http://scrappingwithchristine.blogspot.com/
Erin Morehouse-Kislingbury: http://girlpaperscissors.blogspot.com/
Charissa Miller:  http://www.akihasmommascraps.com/
Nicole Laha: http://www.shezigzags.blogspot.com/
Claude Campeau: http://www.imzadi481.blogspot.ca/
Lanette Erickson: http://stacksofscraps.blogspot.com/
Malika Kelly: http://www.malikakelly.blogspot.com/
Danielle de Konink: http://picsandcheesecake.blogspot.nl/
Lisa Peeples: http://www.snappinandscrappin.blogspot.com/
Mary Pat Siehl: http://siehledwithakiss.blogspot.com/
Wendi Robinson: http://scrappydayinparadise.blogspot.com/
Julie Comeau: http://lepetitmondedeglamotte.blogspot.ca/
Kim Ryden: http://www.rydenkim.blogspot.com/
Ruth Bonser: http://scrapmachine.com/
Krissy Clark McKee: http://krissyclarkmckee.blogspot.com/  That's me!
Marcia Dehn-Nix: http://onescrapatatime-bymumsie.blogspot.com/
Cathy Harper: http://www.alteredplayground.blogspot.com
Rhonda Van Ginkel: http://snapwhiz.blogspot.com/
Scraptown Lady:  http://scrap-town-lady.blogspot.com/

 If we have inspired you so much that you “need” to do a little shopping now, SCRAPTOWN LADY is offering 20% off all orders during the hop!  The sale runs from now ‘til midnight Monday.  Enter “code20” to receive your discount.
 
And, as an extra prize, if you start following my blog and leave a comment, you will also be eligible to win a free project life online class with my dear friend, the amazingly talented LISA WILKINSON.  An example of her wonderful work can be found HERE.
 
Now, for my take on Project Life....well...er, the whole keeping up with a year long project every.single.week. was a bit intimidating to me.  But, what I decided I DID want to do, was keep a small journal-type scrapbook with all of the (numerous) INSTAGRAM pictures I take that usually end up sitting on my phone forever and ever.  Using a smaller SNAP album and having a quick way to document the stories behind my day-to-day Instagram photos was very appealing to me, so that is what I have begun to do.  This is my start; let me know what you think:

So far, I have used a combination of AMERICAN CRAFTS and PRETTY LITTLE STUDIO papers.  Why?  Because they were already on my work table and I had lots of scrap pieces sitting out - perfect for a smaller format like this!


Because this is my "everyday" album, full of my "everyday" thoughts - I have committed myself to journaling about them all - the good, the bad, and the ugly!  Kind of scary, but also liberating in a way.  And if I don't want anyone else to see it, I'll just put it on a pretty tag and stick it in a pocket.  That makes everything better, right?!  Right!!! (For the record, though, the journaling on this tag was quite happy - just saying!)


I love using random left-over bits and incorporating them into several pages - something I also tend to do with my 12x12 layouts.


That's it for me!  Ready for more inspiration?  Okay!  Your next stop is: 
Marcia Dehn-Nix: http://onescrapatatime-bymumsie.blogspot.com/

Happy hopping!!!
 

Monday, June 24, 2013

Getting Fussy with my Scissors (Practical Scrappers)

 
Today at PRACTICAL SCRAPPERS, our On Trend team is showing everyone how we get fussy.  No, we aren't having a rant over there, we are showing off our layouts and cards in which we used a technique called "fussy cutting."  What exactly IS fussy cutting?  I think the best, easiest way to describe it is how diecuts are made without a diecutting machine - like a Silhouette Cameo.  You see an image or shape you like on a piece of paper and you cut it out to add to your layout or project.  It's that simple!

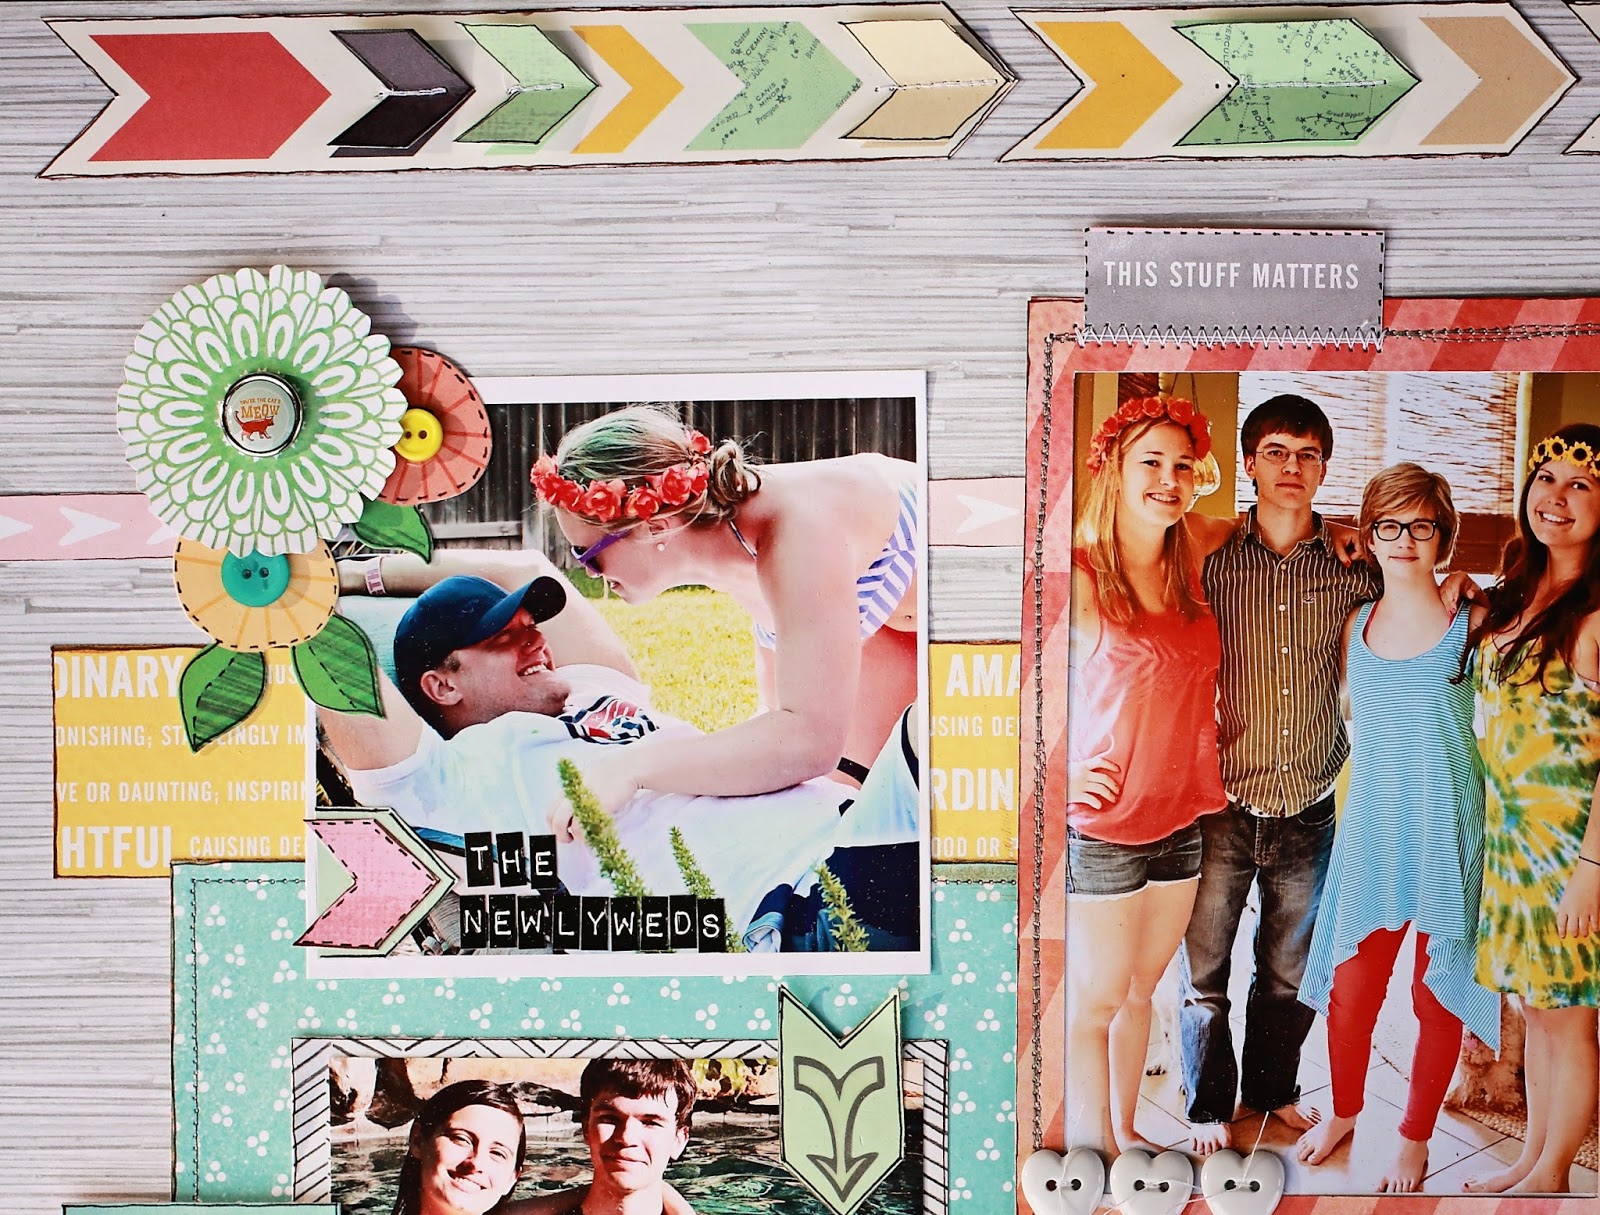
Often, when crafters think about fussy cutting, we think of projects using what I call "image rich" papers (yes, I just now coined that term - feel free to quote me!) - Graphic 45 and Websters are two of the big names who design these types of papers.  But fussy cutting isn't only limited to cutting out elaborate, detailed images; it can be as simple as cutting out chevrons from a patterned paper you like to make and accent your embellishments, like I did in this layout using a combination of AMERICAN CRAFTS papers from the Yes, Please and Lucky Charm collections.  I took this paper:


...and I cut right outside the outline of several chevrons to create my arrows.  I then cut out individual chevrons and layered them on top of matching ones on my arrows by machine stitching them along the center line so that I ended up with this:


And, as you can see, because I loved my chevron arrows so much, I also used them as accents to draw attention to several of the individual photos - quick and easy embellishments that only required scissors and paper!

Of course, I did use my Silhouette, too, to make this adorable bicycle (which I embellished with buttons, a fabric heart sticker, and my bicycle flag made from twine and a hand made pennant).


...and to make this frame.  It was originally a polaroid frame that I elongated to fit my 4x6 photo.  I adhered different scraps of my AC papers behind each of my letters to make it extra-colorful.


Before I go, I wanted to leave a few tips for fussy cutting:

1.  Sharp scissors are an absolute MUST.  If your scissors aren't sharp, you will often end up with a frayed edge that looks a little "chewed up" by your scissors.  Fraying and distressing are good but NOT when you are fussy cutting!
 
2.  Maybe it's because I have small hands, but smaller scissors generally work better for fussy cutting.  They allow you to maneuver your scissors more easily when cutting out a shape, especially more intricate shapes.
 
3.  To keep your fingers from cramping and feeling like you will never be able to fully straighten them out again (especially if you are cutting out an intricate shape or lots of shapes), I highly recommend getting spring-loaded scissors, such as these, which can be found in most craft and sewing stores. 
 
 
That's it for me today.  But you know I'll be back - I've got some Pretty Little Studio and a blog hop in the works, so stay tuned!

Wednesday, March 27, 2013

Happy Hearts (Practical Scrappers)

 
Who's happy today?  I am!  Why?  Because PRACTICAL SCRAPPERS has a new sketch reveal by Liz Chidester that is featured on today's blog!  And if that isn't enough to get you motivated, I think all the wonderful layouts we girls created are sure to inspire you!  (If I do say so myself)
 
I LOVED this month's sketch, even though I didn't follow it exactly - and that's okay because it means that I can play with it again!  Here is my layout, featuring my baby boy and his favorite gal (besides his mama):


I used wonderful papers by AMERICAN CRAFTS - I am loving evey single one of their new collections that have been released recently.  I cut out my background shaped heart paper using my Silhouette and then sewed and glued the leftover hearts on my stitched circle. 
 
 
I also L-O-V-E-D these vellum hearts that I found at Archiver's a few weeks ago.  More heart shapes from my background "heart paper" were glued on the little arrow at the bottom of this picture.
 
Thanks for stopping by!  That's it for me today, but be sure to head over to PRACTICAL SCRAPPERS and leave a little love!  And, of course, you can ALWAYS leave a little love for me here, too!

Monday, March 18, 2013

Don't You Love My Silhouette (Practical Scrappers)

Happy Monday, everyone!  To get my week started right, I stayed up until the late, late, late hours of the night working on this project for PRACTICAL SCRAPPERS where the On Trend Team and a few other PS members (like me) got together and showed what fun things can be done with a Silhouette Cameo. 

My ideas were pretty simple - but the good thing about using my Cameo is that just about EVERY project is simple!  I had it cut two rows of arrows in my AMERICAN CRAFTS background paper. Then I placed fussy cut arrows next to each row that I machine stitched to my paper.

 
The next thing I used my Silhouette Cameo for was my bouquet of flowers.  Van Gogh may have created the Starry Night, but I believe I have now created the Starry Bouquet!  The star file I used had a slightly warped shape, which I then accentuated by stretching the stars out - making them look more flower like.  I pop-dotted them for more dimension and drew the stems connecting each flower to my vase.  The vase was fussy cut, also pop-dotted for more dimension, but then the edges were glued down.  I outlined each star flower in white and placed a little shiny metallic star in each center.
 
 
That's it for me today (yawn) - now I think it's time for a nap!  Of course, I am at work so that may have to wait...

Monday, January 14, 2013

These Are the Days

Happy Monday! It is the typical gloomy, rainy Monday here that definitely makes me want to stay in my jammies and not leave my house for any reason. But - I had to brave the traffic and head in to the 9-to-5 that pays the bills - and more importantly, that pays for all my scrappy goodies! So, I figured if I can't see the sunshine, I can be the sunshine (Man, I should market that). That's right, I am going to be happy and cheerful today if it KILLS me (and it just might).  
 
Speaking of happy and cheerful, something that is guaranteed to put a smile on my face is these two girls. Little Lula has learned how to tell Knock-Knock jokes and she was clearly cracking herself up in this picture! The Huntress kept looking over at me and rolling her eyes at the "silliness" of it all (as if she weren't a 3-year-old herself just the other day), but she was clearly having a good time! I put this layout together using a great sketch found over at LET'S CAPTURE OUR MEMORIES. I like it so much that I already have plans to use it again (which is very unusual for me). My papers are a combination of ECHO PARK'S Sweet Day, Everyday Eclectic, and maybe another EP collection thrown in for good measure. Why did I use so many collections and patterns, you ask? Why, because I was playing along with the Cha '13 Online Winter Social Challenges found over at the TWO PEAS site. You know me - can't so no to a good challenge, and this one to use 7 different patterned papers was no exception! Want to see a few close-ups? 
 
Journaling and title combined (one of my very favorite things to do lately):

I liked this ribbon-flower-thingy embellishment, except the banners weren't the right color and I didn't like the little picture on the front. But I really did like it - really!  So - I made a few changes and embellished my embellishment - ha!

I may have stuck with EP for my papers, but October Afternoon and American Crafts made their way onto my layout via their wonderful bits and pieces that I had to use!

And, finally, my stars...which have machine stitching going across them because I am a machine-stitching junkie! (But I can stop any time I want! I just don't want to right now.)

And that's it for me today. I truly hope I have managed to brighten YOUR day - if only a little bit.


Wednesday, January 9, 2013

Here and Now - Practical Scrappers Frugal Finds

After dithering around and tearing up and re-starting this layout in a fit of pique a couple of times, that had NOTHING to do with my Practical Scrappers assignment - all operator error I'm afraid - here it is, my contribution to the PRACTICAL SCRAPPERS Frugal Finds Challenge.
 
What is it, you ask? Well...it's a common household item. It is...toothpicks! That's right, the things you use to test cakes or to get something unstuck from between your teeth (if you don't have floss or a toothbrush handy). I tried to do something a tad bit (and it seems that a tad bit is all I came up with) more creative than a little flag, so I made - an arrow.  I wanted to accent my arrow and add a little dimension to it, so I used a toothpick as the base - can you see it here?
 

It may not be the most ingenious idea, but you gotta give me points for cuteness!  My arrows (on top of my little toothpick) were cut out using my Silhouette Cameo *doing my stuck record impression - I love my Cameo, I love my Cameo, I love my Cameo* along with this really cute polaroid frame that I simply stretched out a little before printing so it would fit the dimensions of my picture, which is NOT a polaroid size.
Of course, I outlined and doodled on just about everything with my black zig marker - my favorite thing to do these days it seems.  My papers are by AMERICAN CRAFTS , which work perfectly for this unguarded photo of my daughter, who was so caught up in her music that she was oblivious to everything around her (even her crazy picture-taking mom who snuck up on her with the camera)!

Seriously, my toothpick arrow may be cute - but you have GOT to check out the other PRACTICAL SCRAPPERS ladies' ideas. They will blow you away! So go! Click the link already! What are you waiting for?!