Showing posts with label birthday. Show all posts

Tuesday, June 25, 2013

Playing with Pebbles (Sketchy Thursday)

I know I have said this at least a hundred and five times but...wait for it...I LOVE sketches!!!  And when I saw the BECKY FLECK sketch up at PEBBLES for Sketchy Thursday, it was definitely love at first sight!  So, I raided my Pebbles stash and created this layout from a combination of the Seen and Noted, Sunnyside, and Basics collections. 

This picture is the ONLY one I took on little Huntie's 13th birthday!  Such a big banner day and she only got one photo (a fact that she is most likely immensely thankful for!)  But in my rush to get out of the house and get Huntie and her bestie to the water park, I forgot my camera.  And since cell phones and water are not a good combination, this one lone shot away from any H20 was as good as it got.  But the layout captures the mood of the day and I have a very detailed letter to my daughter added to the back of this.  And we had FUN, which is what birthday celebrations are all about!
 
I am really pleased with my clouds and sun, which I created with my Silhouette Cameo.


I did a little stamping across my clouds to match my stamp-turned-splatter that I "deliberately" created in the background (you totally believe me, don't you???)  And I machine-stitched around my sun (this time it really was deliberately messy, I promise) to add a little bit of movement and fun to my layout.  Pop dots to add dimension behind a cloud and my "hello" were the perfect finishing touches.

 
I love this cluster - it's not too much and not too little but j-u-u-s-s-t right.  I used flower stickers, with pop dots behind the two smaller ones; a life is good sentiment cut out from a sheet of banners and sentiments in the Sunnyside collection; and a large journaling tag that anchors the entire cluster down.  My 13 was quickly cut out using my Silhouette.  Because I used so much white in this layout, I accented everything with doodling to help it stand out.
 
That's it for me today - but stay tuned!  A Pretty Little Studio project and a Practical Scrappers Blog Hop (with a cool grand prize) are headed your way!!!

Thursday, April 11, 2013

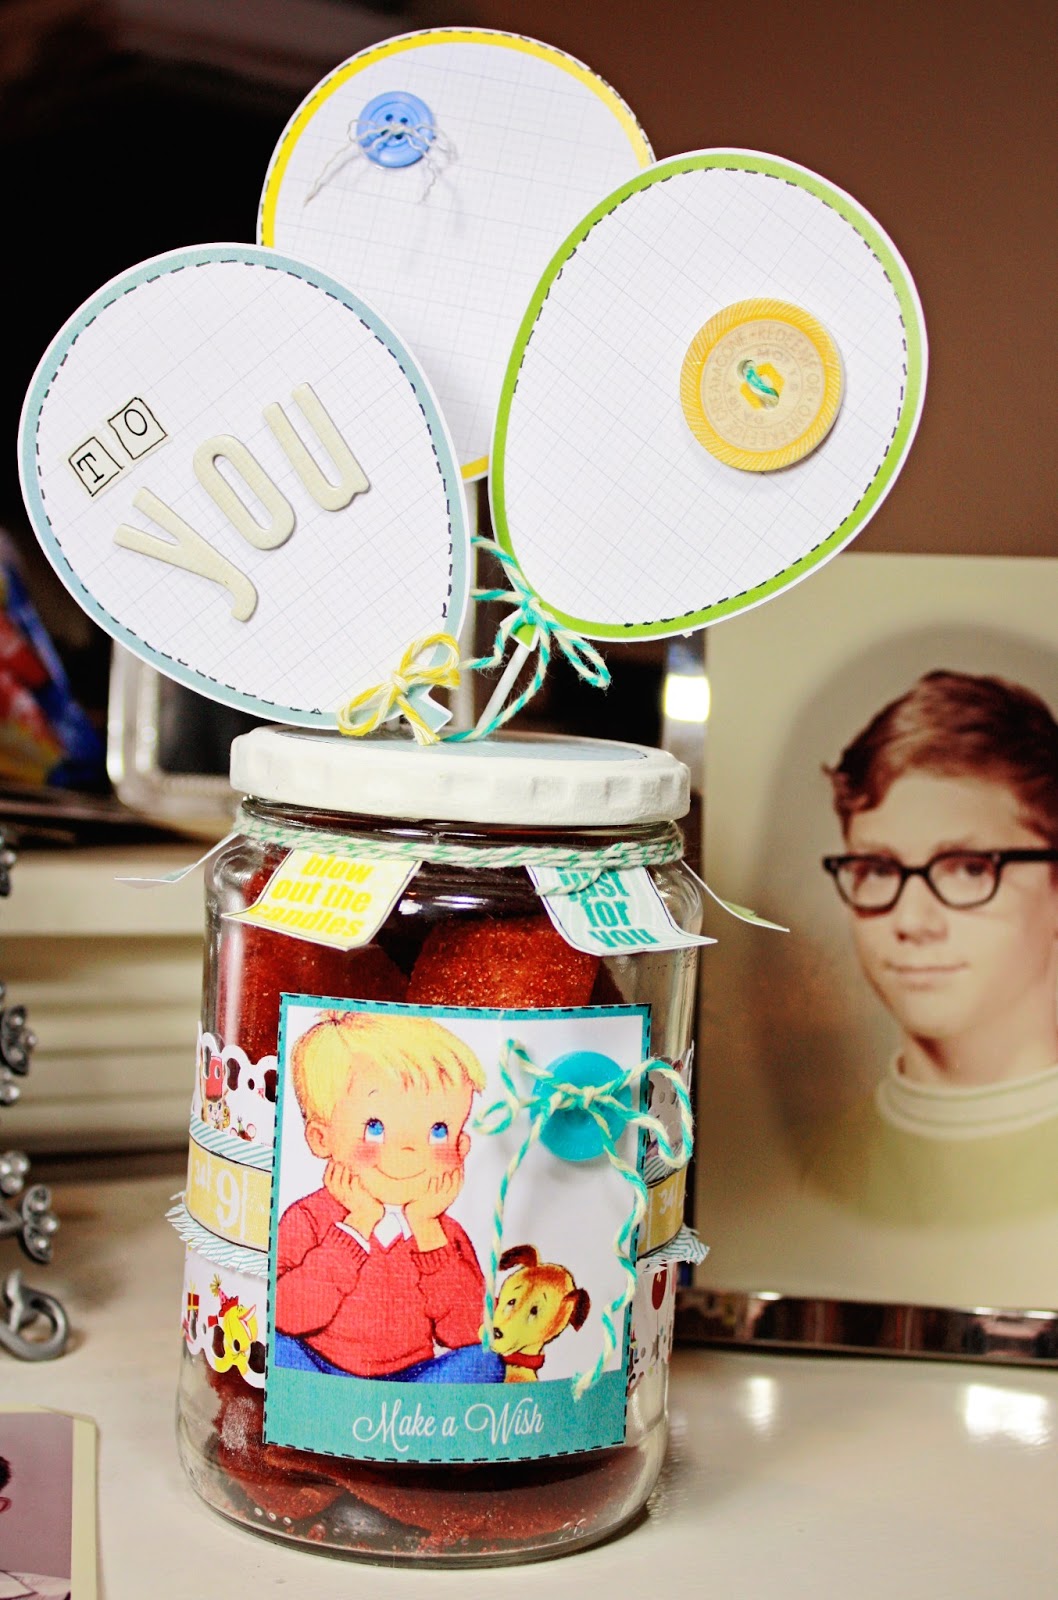
Birthday Treat Jar - Pretty Little Studio


I'm b-a-a-a-a-ck - this time with a quick and easy (and totally adorable) project that you can use for an assortment of homemade gifts and goodies - for a friend, a favorite teacher, or even as a birthday gift for hubby!  That's my guy to the right, by the way, when he was a precocious 11 year old.  Come to think of it, he's still a precocious 11 year old, he just has an additional forty-something years added to his body!

I created this project for PRETTY LITTLE STUDIO,  using their fantabulous Birthday Cake Collection, as part of this week's OOTB Challenge.  It seems to be one of my overall favorite collections, with it's happy, brightly colored papers and tags.  My jar started out as a smelly old pickle jar (that I washed thoroughly, just in case you are wondering) that the Hubster (who loves all things pickled and smelly) had recently emptied out - and by emptied out, I mean he consumed a little bit of hamburger smothered in no less than half a jar of pickles!  So, it was only fitting that I converted that particular jar into a birthday gift for him.

My 8x8 paper wasn't quite wide enough to wrap all the way around my jar, so I cheated.  I cut two pieces and glued them together matching the patterns up at the connecting seam as much as possible.  My base paper was cut using my Silhouette Cameo.  I cut out the ruler from one of my sheets and glued it to a slightly wider blue base, which I then cut with scissors along the bottom to make a fringe.  Once everything was glued to my jar, I added this adorable "Make a Wish" Polaroid Diecut to the front using pop-dots for a little extra dimension.  A button with a little bit of twine glued to the front and the base of my jar was almost complete.

My next step was to add my sentiment tags around the neck of the jar.  I adhered them, evenly spaced, to the neck of the jar and simply wrapped a piece of baker's twine around everything a few times.  

My last step was to decorate the lid.
First, I painted the top white.  After it dried, I traced out the circle onto a piece of my paper, which I then cut out and glued to the lid.  I sneaked into the garage, where I found my husband's drill - just sitting there, looking unused and unloved.  I drilled three holes into the lid of my jar, using the smallest bit I could find.  Then I simply put a toothpick through each hole and glued a balloon journaling tag to each toothpick.  Note: I added Glossy Accents to each hole before inserting my toothpicks.  Because Glossy Accents hardens to a cement-like consistency, there was no chance my toothpick-based balloons would come undone - something that is very important since the balloons are on a functional lid which will be repeatedly taken off and put back on to get to the treats inside, if I know my husband!  A little more baker's  twine, a couple of buttons, a few letters, and I was done!  The only thing better than a project coming together with no hiccups is a project that quickly comes together with no hiccups.  Much of that was due to my wonderfully coordinated PRETTY LITTLE STUDIO supplies, which all seem to go together perfectly!

And now that it is finished and was presented with much fanfare to my guy for his birthday, I can tell you that Hubsy LOVES his treat jar!  Okay, maybe he really just loves the goodies inside the jar, but he is smart enough to make the appropriate appreciative sounds about the jar itself.  *smile*

To view this week's inspiration and the other fantastic projects completed by our Design Team, head over to the Pretty Little Studio BLOG.  You are going to LOVE what you see - I just know it!

Wednesday, April 10, 2013

Happy Birthday, Honey Bunny

 
Today is the Hubster's birthday.  I can't tell you how old he is without him divorcing me, but let's just say he is at the "distinguished-looking" age.  And if you guessed "distinguished-looking" appears to be about 59 years old - well, you just might be correct!  I won't tell, though!  No matter - he is handsome and kind and wonderful.  I wouldn't trade him for anything, and I thought today was the perfect day to tell my honey-bunny exactly that.  And, of course, I posted it all to PRACTICAL SCRAPPERS where I am up today (but don't worry, I didn't tell them my man was 59 either).
 
Here is my layout:
 
 
I used more of my MY CREATIVE SCRAPBOOK kit that I received as one of the April Guest Designers.  So far, I have created 3 layouts and 3 cards using the main kit, and I STILL have stuff left over!  That's a pretty awesome kit if you ask me!
 
 
I had fun adding these layers.  I started with a border of my yellow paper that I made using my Silhouette Cameo.  Then I sewed a layer of lace on top, making sure to leave the bottom tips of the yellow border exposed.  My last step was to sew these adorable "LOVE" tags on top of everything.  I couldn't resist adding a heart button!
 
And I love this little cluster.  I layered, adding pop dots to some parts for increased depth, until it was j-u-s-t right. 
 
 
Finally, here is the card I made - simple, yes.  But perfect for my best (and only) guy!
 
 
That's it for me today, but I will be back tomorrow to show you a homemade birthday gift I made for my man.  It was simple, it was easy, and it is SUPER cute!  Stay tuned...
 
In the meantime, go check out all the cool stuff going on at PRACTICAL SCRAPPERS, like these ideas for using TWINE or SEQUINS.  That's right, I said sequins!

Wednesday, April 3, 2013

Birthday Crown - Pretty Little Studio

 
I am up on the PRETTY LITTLE STUDIO BLOG today with a fun tutorial on how to make this birthday crown.  How did I come up with the idea, you ask?  Well, last year, my oldest baby and I were at Party City, where she saw a crown that she just had to have for her birthday.  Of course, I got it for her but I vowed that the very next year I was going to make her a bigger, better crown.  And that is just what I did!  Here is my kalliebeth last year wearing her cute but average-looking crown:


And here she is this year wearing the birthday crown her very proud mama (that's me) made for her:


The crown was extremely easy to make, and it turned out so cute using various collections by Pretty Little Studio.  The supply list and tutorial are on the BLOG, along with wonderful close-ups like this one:

Hope to see you over there!

Sunday, June 10, 2012

Happy Birthday, Baby!


Today, the baby of my little brood turns 12.  Hard to believe it's been that long since she made her impatient entry into the world at the crack of dawn - two weeks before her due date because she couldn't stand to wait a moment longer.  She had things to do!  And she hasn't slowed down even once ever since.

I have a fun project that I will be sharing with you on Thursday, the 14th, featuring this child on one of our recent walks.  It has a quick video tutorial, and I can't wait to show it to you!  Until then, I will leave you with a few of my favorite photos from our walk which will be making a re-appearance in my project.


Happy Sunday everyone!  Hope it's a good one!

Wednesday, May 30, 2012

Celebrating One of My Favorite Things with Practical Scrappers


I will let you in on a little secret.  Today is my birthday.  Yippee!!!  And what better way to celebrate than by showing you one of my very favorite things to do on a layout.  What is it?  Can you guess?  It's machine stitching!  And PRACTICAL SCRAPPERS chose today, of all days, to do a post on machine-stitched layouts.  Coincidence?  I think not!  So, of course, I contributed with this layout, on which I machine stitched just about anything that could possibly move.  And the little pieces (like the diamond-shaped pieces of paper) that I was too lazy were too little to be easily stitched - I just doodled around those edges so they would look stitched, too.

To get started, I used a wonderful sketch by the very talented Amaryllis found over at SCRAP THAT, a kit club where my bestie, ALISSA, is a design team member.  Papers are from Pink Paislee's Prairie Hill Collection, and my shaped papers were cut out using my Silhouette.  The picture you see?  It is one of my second daughter's engagement photos that I am totally in love with!  Let me warn you, there are about 50 more pictures from her engagement shoot that I am also "totally in love with" so you will be seeing quite a few more!  So gird your loins! (ha! - I love using that phrase)

I love the pops of color this cluster of flower adds.  They are by Basic Grey, but I thought they worked quite well with this layout.


Machine sewing across chipboard alphas is a great look, I think.  Don't be afraid, your sewing machine should be able to handle it quite easily as long as you go slowly.


I love adding a zig zag stitch as a way of defining my border near the edges of my layout.  Smaller pieces of paper use a simple straight stitch - sometimes once around and sometimes twice around the paper - almost always deliberately NOT straight, because I like the "messy" look it provides.  You can see that my small diamond shapes have doodling in brown marker that matches the thread I used in my machine stitching.  Even my photo has a zig zag stitch going across it as an accent (and to hold my twine in place).

Layers + stitching = LOVE!!!


That's all for today.  Now, I am off to have breakfast with my oldest "babies" but, before I go, I wanted to leave my birthday wish for YOU.  Celebrate life.  Celebrate it every day.  Document it.  LIVE it.  Enjoy the beauty and the wonder and the excitement (and even the uncertainty) that is each new day.  I love you all and look forward to spending my next year with you!

Hugs and Kisses!