Showing posts with label Birthday Cake Collection. Show all posts

Thursday, February 6, 2014

Color Challenge with Pretty Little Studio


My crafty mojo has definitely been vacationing somewhere (probably warmer) these past few days, so PRETTY LITTLE STUDIO'S COLOR CHALLENGE was exactly what I needed to convince it to come back to me!  Can you tell what colors we were challenged to use together?  If you guessed pink and red, you are correct!  This is what I came up with, using a fabulous picture of some even more fabulous women that I am privileged to call my friends:


If you are like me, you bought a lot of Christmas papers and didn't touch nearly half of them.  Well, it's time to think outside the box - find ways to use all those wonderful papers for non-holiday layouts, which is exactly what I did with my leftover papers, stickers, and journaling tags from the WOODLAND CHRISTMAS COLLECTION.  (I have a confession to make - I love some of the papers, especially the vellum papers from this collection, that I have every intention of using them year round!)  They go perfectly with the pinks found on the flags, die cuts and papers in the BIRTHDAY CAKE COLLECTION and NEAPOLITAN COLLECTION.

I used lots of layering and lots of pop dots to help the different elements on my layout to stand out.


I absolutely love the way the bright pops of red look against the white background and softer pink hues of my patterned papers!


That's it for me today.  Want to play along?  Be sure to upload YOUR creation to Pretty Little Studio's FACEBOOK PAGE.  We would love to see what you create!!!

Wednesday, July 31, 2013

Journal Updates with Pretty Little Studio


I am slowly but surely continuing on with my everyday journal - not everyday as in I add something to it every day.  But everyday as in I am using my Instagram and cell phone pictures (that I might not otherwise use for a layout) and including more in-depth journaling.  This smaller format is PERFECT for me.  It allows me to keep the time for each page at roughly thirty minutes (although that does lengthen whenever I decide to add cute little inserts that I can't seem to resist). 
 
Today, I am up at PRETTY LITTLE STUDIO showcasing several of my recent pages (yes, I am still a few months behind but I am getting there). 
 
Pretty Little Studio products are absolutely perfectamundo for my little hybrid wants-to-be-a-project-life-but-not-ready-for-that-commitment-yet journal.  Why?  Because PLS has tons (and I do mean lots and lots and lots) of die cards, journaling tags, tabs, word bubbles, banner flags - all things perfect for a little journal like mine.  Want to see?
 
The tags and die cuts from the NATURE WALK COLLECTION were perfect for this page about Little Lula who loves to tell me stories - all kinds of stories!  And her little face is so-o-o-o-o-o expressive that I love to photograph her whenever she is telling me a story.  Right now, Goldilocks and The 3 Little Pigs are two of her favorites.
 
 
Of course, I couldn't resist making a little pocket insert with these adorable Nature Walk die cuts and journaling tags!  How cute is that little bear???  And with two pockets, I have more than enough room to journal all I want.


And, Pretty Little Studio papers and products are also perfect for pages about bigger kids.  Like, much bigger kids.  Like, kids that are so big you might otherwise mistake them for adults.  Like...me.
Like...this page...where I am finally revealing one of my secret morning rituals to the world.  Nope, it's not about an expensive Parisian face cream that costs $250 per ounce.  It's much geekier and much more juvenile than that...
 
 
Notice the little decorative strips of paper at the bottom of this page?  If you guessed those are scraps that I absolutely could not throw away because I KNEW they would be perfect for some unknown project in the future, you would be 100% correct.  But they are perfect for this page so I am feeling completely justified about my scrap paper hording storage habits.
 
And finally, this last page - which is really just a page in progress...
 
 
If I didn't know better, I would swear the powers-that-be at Pretty Little Studio snuck into my Mama's house and found a birthday card from my childhood squirreled away in my old bedroom.  But, uh, I don't know who put the 45 numbers on the card.  Certainly not me....I can't possibly be that old yet.  Seriously.  Honest.
 
And that's it for me today.  Do you do Project Life or any hybrid form like this?  If so, what do you do to keep up and not fall behind?  I would love to hear your tips and ideas!

Friday, May 24, 2013

Up Up and Away - Pretty Little Studio

 
You know me, every time I start to throw something away that is torn or broken, the little creative light bulb over my head starts to flash and I realize I have another awesome trash to treasure project just waiting to be completed.  Such was the case with this sad piece of wall decor that had been hanging in my laundry room for so long that the decoupaged paper had begun to peel off.


Into my craft room I went and with the help of my acrylic paints and PRETTY LITTLE STUDIO papers, mostly from the Birthday Cake Collection, I turned a sad, torn wall hanging destined for the trash pile into this:


I loved adding these 3D balloons and think they are worthy of a close-up or two:


Would you like to see how I made this?  For step by step instructions, head over to the Pretty Little Studio BLOG, where I am featured today!  Hope to see you there!!!

Thursday, April 11, 2013

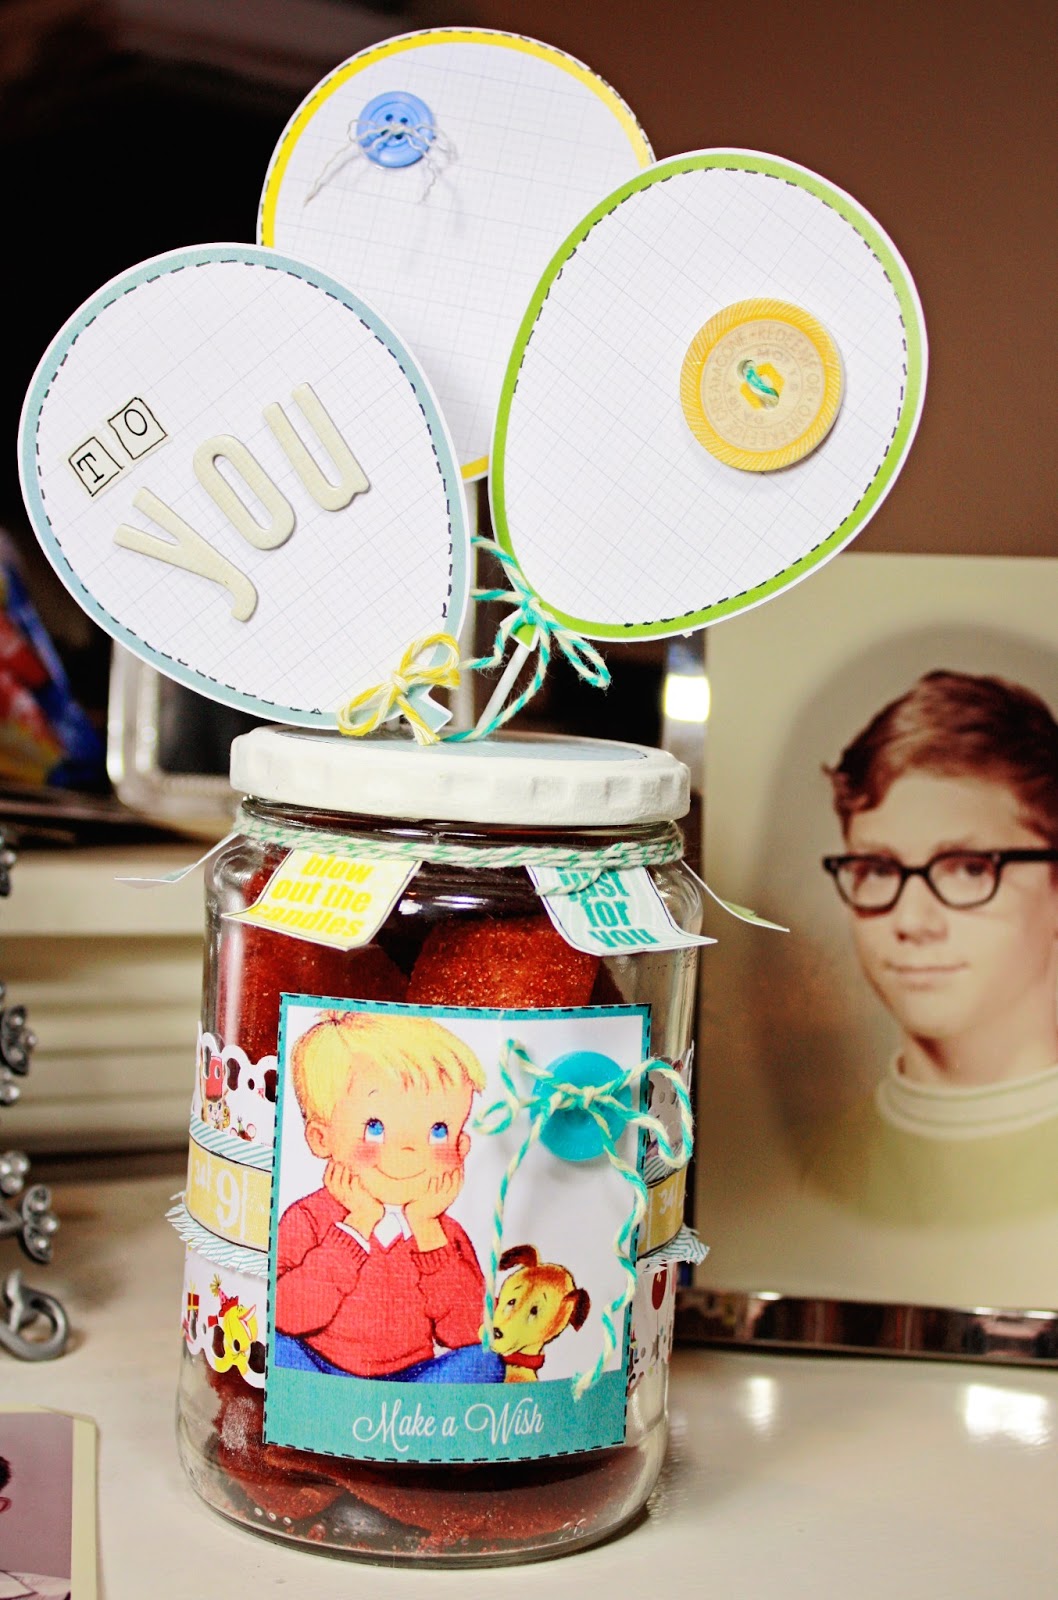
Birthday Treat Jar - Pretty Little Studio


I'm b-a-a-a-a-ck - this time with a quick and easy (and totally adorable) project that you can use for an assortment of homemade gifts and goodies - for a friend, a favorite teacher, or even as a birthday gift for hubby!  That's my guy to the right, by the way, when he was a precocious 11 year old.  Come to think of it, he's still a precocious 11 year old, he just has an additional forty-something years added to his body!

I created this project for PRETTY LITTLE STUDIO,  using their fantabulous Birthday Cake Collection, as part of this week's OOTB Challenge.  It seems to be one of my overall favorite collections, with it's happy, brightly colored papers and tags.  My jar started out as a smelly old pickle jar (that I washed thoroughly, just in case you are wondering) that the Hubster (who loves all things pickled and smelly) had recently emptied out - and by emptied out, I mean he consumed a little bit of hamburger smothered in no less than half a jar of pickles!  So, it was only fitting that I converted that particular jar into a birthday gift for him.

My 8x8 paper wasn't quite wide enough to wrap all the way around my jar, so I cheated.  I cut two pieces and glued them together matching the patterns up at the connecting seam as much as possible.  My base paper was cut using my Silhouette Cameo.  I cut out the ruler from one of my sheets and glued it to a slightly wider blue base, which I then cut with scissors along the bottom to make a fringe.  Once everything was glued to my jar, I added this adorable "Make a Wish" Polaroid Diecut to the front using pop-dots for a little extra dimension.  A button with a little bit of twine glued to the front and the base of my jar was almost complete.

My next step was to add my sentiment tags around the neck of the jar.  I adhered them, evenly spaced, to the neck of the jar and simply wrapped a piece of baker's twine around everything a few times.  

My last step was to decorate the lid.
First, I painted the top white.  After it dried, I traced out the circle onto a piece of my paper, which I then cut out and glued to the lid.  I sneaked into the garage, where I found my husband's drill - just sitting there, looking unused and unloved.  I drilled three holes into the lid of my jar, using the smallest bit I could find.  Then I simply put a toothpick through each hole and glued a balloon journaling tag to each toothpick.  Note: I added Glossy Accents to each hole before inserting my toothpicks.  Because Glossy Accents hardens to a cement-like consistency, there was no chance my toothpick-based balloons would come undone - something that is very important since the balloons are on a functional lid which will be repeatedly taken off and put back on to get to the treats inside, if I know my husband!  A little more baker's  twine, a couple of buttons, a few letters, and I was done!  The only thing better than a project coming together with no hiccups is a project that quickly comes together with no hiccups.  Much of that was due to my wonderfully coordinated PRETTY LITTLE STUDIO supplies, which all seem to go together perfectly!

And now that it is finished and was presented with much fanfare to my guy for his birthday, I can tell you that Hubsy LOVES his treat jar!  Okay, maybe he really just loves the goodies inside the jar, but he is smart enough to make the appropriate appreciative sounds about the jar itself.  *smile*

To view this week's inspiration and the other fantastic projects completed by our Design Team, head over to the Pretty Little Studio BLOG.  You are going to LOVE what you see - I just know it!

Wednesday, April 3, 2013

Birthday Crown - Pretty Little Studio

 
I am up on the PRETTY LITTLE STUDIO BLOG today with a fun tutorial on how to make this birthday crown.  How did I come up with the idea, you ask?  Well, last year, my oldest baby and I were at Party City, where she saw a crown that she just had to have for her birthday.  Of course, I got it for her but I vowed that the very next year I was going to make her a bigger, better crown.  And that is just what I did!  Here is my kalliebeth last year wearing her cute but average-looking crown:


And here she is this year wearing the birthday crown her very proud mama (that's me) made for her:


The crown was extremely easy to make, and it turned out so cute using various collections by Pretty Little Studio.  The supply list and tutorial are on the BLOG, along with wonderful close-ups like this one:

Hope to see you over there!

Tuesday, February 26, 2013

Pretty Little Studio Welcomes...Me!!!


PRETTY LITTLE STUDIO has been announcing the new Design Team members on its blog all week.  Have you been following along and entering to win free Pretty Little Studio Products?  You have GOT to stop by today for a couple of reasons!  Why?  Well, first, because today's blog is all about m-e-e-e-e-e-e-e!!!!!!!  Yippee!  And, if you need a good laugh, I am pretty sure I have somehow managed to turn in the absolutely, positively geekiest design team member picture ever in the history of design team member pictures!  But, you know what?  I have decided I am okay with that - because I am a big geek AND because, for the next six months, this geeky girl gets to play with fantastically wonderful PLS products and make fun layouts like this one - using papers from the Hopscotch Collection and a few goodies from the new Birthday Cake Collection.

 
(I totally stole borrowed the bunny button tail idea from the wonderfully talented Izzy Anderson, whose cardmaking and scrapbooking style I adore!)

For those of you who know me, MY favorite product that you can win is...wait for it...BANNERS!  Actually, technically, these are called (super adorable) bunting flags from the brand new Birthday Cake Collection, but guess what you can make with them?  You got it - banners!!!
And even better, there are also two coupon codes so you can go ahead and grab all the vintage die cuts, and mini-calendars, and journaling cards that you want! They expire March 1, so don't wait!
Coupon
Oh!  Real quick, before you head over to Pretty Little Studio to laugh at my picture, enter to win those suh-weet bunting flags, and indulge in a little on-line shopping with these coupons, here are a few close-ups of my layout:
 
(Seriously, how cute are these clouds?!!!)
 
(Most adorable animal die-cuts E.V.E.R.)
 
(Here is how I used one of the bunting flags.)
 
That's it for me.  Try not to hurt yourself laughing too hard at my picture.  And have fun shopping and loading up on Pretty Little Studio goodies!