Showing posts with label altered item. Show all posts

Monday, October 21, 2013

Home Decor - My Way!


Happy Monday!  And it IS a happy Monday.  Want to know why?  Because I am on the Pretty Little Studio BLOG with a home decor project that is done  - MY WAY (echo echo echo echo)!  What does that mean?  It means I took this:


...which was cute but a little too redtastic for me.  And, under the {intense} watchful supervision of Cross-eyed Pete, who loves all things arts and crafts, especially if he can get his paws on it:


as well as the help of Mod Podge, a little spray paint, and the Pretty Little Studio NEAPOLITAN COLLECTION, I turned it into a calmer, pastel-ier this - intended to hold my pin cushion and pins for sewing:


I love being able to alter things so that they look exactly the way I want them to.  It's nice when things go...my way.  *smile*

Thursday, April 11, 2013

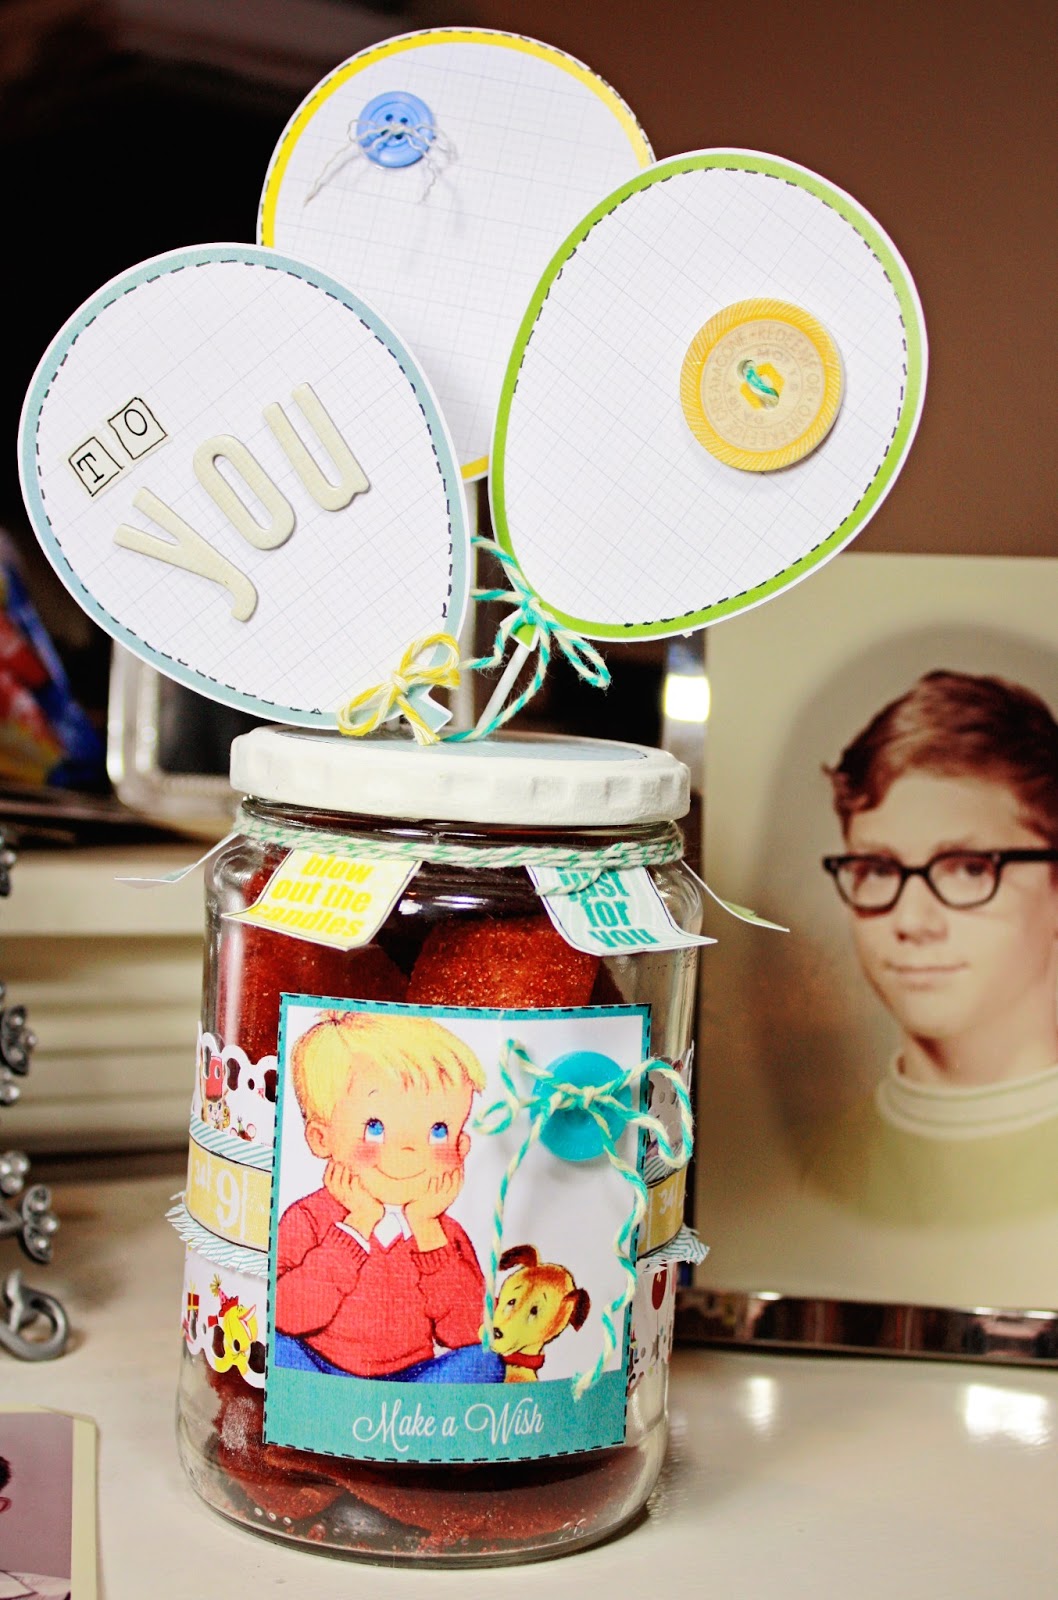
Birthday Treat Jar - Pretty Little Studio


I'm b-a-a-a-a-ck - this time with a quick and easy (and totally adorable) project that you can use for an assortment of homemade gifts and goodies - for a friend, a favorite teacher, or even as a birthday gift for hubby!  That's my guy to the right, by the way, when he was a precocious 11 year old.  Come to think of it, he's still a precocious 11 year old, he just has an additional forty-something years added to his body!

I created this project for PRETTY LITTLE STUDIO,  using their fantabulous Birthday Cake Collection, as part of this week's OOTB Challenge.  It seems to be one of my overall favorite collections, with it's happy, brightly colored papers and tags.  My jar started out as a smelly old pickle jar (that I washed thoroughly, just in case you are wondering) that the Hubster (who loves all things pickled and smelly) had recently emptied out - and by emptied out, I mean he consumed a little bit of hamburger smothered in no less than half a jar of pickles!  So, it was only fitting that I converted that particular jar into a birthday gift for him.

My 8x8 paper wasn't quite wide enough to wrap all the way around my jar, so I cheated.  I cut two pieces and glued them together matching the patterns up at the connecting seam as much as possible.  My base paper was cut using my Silhouette Cameo.  I cut out the ruler from one of my sheets and glued it to a slightly wider blue base, which I then cut with scissors along the bottom to make a fringe.  Once everything was glued to my jar, I added this adorable "Make a Wish" Polaroid Diecut to the front using pop-dots for a little extra dimension.  A button with a little bit of twine glued to the front and the base of my jar was almost complete.

My next step was to add my sentiment tags around the neck of the jar.  I adhered them, evenly spaced, to the neck of the jar and simply wrapped a piece of baker's twine around everything a few times.  

My last step was to decorate the lid.
First, I painted the top white.  After it dried, I traced out the circle onto a piece of my paper, which I then cut out and glued to the lid.  I sneaked into the garage, where I found my husband's drill - just sitting there, looking unused and unloved.  I drilled three holes into the lid of my jar, using the smallest bit I could find.  Then I simply put a toothpick through each hole and glued a balloon journaling tag to each toothpick.  Note: I added Glossy Accents to each hole before inserting my toothpicks.  Because Glossy Accents hardens to a cement-like consistency, there was no chance my toothpick-based balloons would come undone - something that is very important since the balloons are on a functional lid which will be repeatedly taken off and put back on to get to the treats inside, if I know my husband!  A little more baker's  twine, a couple of buttons, a few letters, and I was done!  The only thing better than a project coming together with no hiccups is a project that quickly comes together with no hiccups.  Much of that was due to my wonderfully coordinated PRETTY LITTLE STUDIO supplies, which all seem to go together perfectly!

And now that it is finished and was presented with much fanfare to my guy for his birthday, I can tell you that Hubsy LOVES his treat jar!  Okay, maybe he really just loves the goodies inside the jar, but he is smart enough to make the appropriate appreciative sounds about the jar itself.  *smile*

To view this week's inspiration and the other fantastic projects completed by our Design Team, head over to the Pretty Little Studio BLOG.  You are going to LOVE what you see - I just know it!

Wednesday, April 3, 2013

Birthday Crown - Pretty Little Studio

 
I am up on the PRETTY LITTLE STUDIO BLOG today with a fun tutorial on how to make this birthday crown.  How did I come up with the idea, you ask?  Well, last year, my oldest baby and I were at Party City, where she saw a crown that she just had to have for her birthday.  Of course, I got it for her but I vowed that the very next year I was going to make her a bigger, better crown.  And that is just what I did!  Here is my kalliebeth last year wearing her cute but average-looking crown:


And here she is this year wearing the birthday crown her very proud mama (that's me) made for her:


The crown was extremely easy to make, and it turned out so cute using various collections by Pretty Little Studio.  The supply list and tutorial are on the BLOG, along with wonderful close-ups like this one:

Hope to see you over there!

Monday, March 4, 2013

From Trash to Treasure (Pretty Little Studio)


Happy Monday everyone!  I am hoping to start your week off on a fun note by sharing this project I made for the great folks over at PRETTY LITTLE STUDIO.  I brought this sad little wooden crate about a year ago at a yard sale (see see how sad it was, just check out the PLS Blog) for nothing.  It was sitting in my closet the entire past year waiting for just the right project to come along.  Well, let me tell you, as soon as I saw the wonderful papers and goodies from the SAND CASTLE COLLECTION and the BIRTHDAY CAKE COLLECTION, I knew the moment was here!

First, I painted my crate white.  Since I wasn't going to cover every piece with paper, I wanted to make sure the exposed wood parts had a pretty little facelift.  Then I measured the wood slats that I did want to cover and simply cut and glued the papers I wanted to use.   I even covered the ends, see?


A few decorations, and I was done with my crate. 


I was initially going to make some paper flowers to go inside the crate, so I purchased a bag of polised rocks at the hobby store for a few bucks.  At the last minute, though, I changed my mind (I know, huge shocker, right?) and decided I wanted to include a few family photos instead.  These wire clips and stems from an old broken picture "thingy" were perfect for holding my pics.  I clipped the wires and buried them in my rocks, then added three embellished pictures.  The best part is, because my pictures are clipped up, I can easily change them out or substitute something else in their place.

I loved backing my photos on these adorable bingo cards and adding little bits of random cuteness around them!


That's if for me today!  Be sure to check our Pretty Little Studio's BLOG because there are lots of fun things coming your way!  And if you wanted to leave a little love, too, well I certainly wouldn't object! 

Saturday, February 4, 2012

Altered Balloon Mobile


It's currently too rainy and cloudy for me to take decent pictures of the project I should be posting for the LCOM SKETCH REVEAL (so be sure to stay tuned for that whenever this epic storm blows over and the sun comes back out). In the meantime, I want to tell you about this fun little project and share a few pictures I took when I finished it last week.

My youngest child, the Huntress, is ALMOST a teen now - something she reminds me of every chance she gets. (In Hunter-speak "almost a teen" means she has a year and a half to go). Regardless, she has recently boxed up her Barbie dolls, although she's not even close to wanting to give them away, and she is changing out her loft bed and juvenile bedding for a Pottery Barn-esque bed that her dad is building for her (at a fraction of the cost, I am proud to say). Her bedroom is being painted, and we are transitioning her pictures and other decorative items to reflect her changing taste. So, when I came across a box in the attic that contained this old, chipped mobile that used to hang in my son's room when he was a toddler, I knew it would be perfect with a little makeover(courtesy of my scrapbooking supplies).


I used my Pink Paislee Daily Junque Collection - a favorite that I have bought and re-bought at least three times since it first made an appearance at my LSS last year - some odds and ends that I had on hand, and a little coat of mod-podge on all my papers to turn it into this:


I tested my mobile out in my guest bedroom, and I can tell you that it looks awfully cute hanging under the air vent where it lazily spins around everytime the air blows - which is quite frequently as our Texas weather seems to ignore the fact that we are in the middle of winter.


A few close-ups:


I LOVE giving an old, tired object a new life! What have you altered or re-purposed lately? Feel free to share links to your projects - I am always looking for inspirational ideas!

Sunday, January 8, 2012

Project Family


So, a few weeks ago, I was chatting with my BIRDS OF A FEATHER sisters, and we were discussing whether we would be doing any daily or monthly projects for the 2012 year. It was a pre-coffee conversation for me, and I incorrectly called one of those projects - Project Family. After confessing to the other ladies that I had misnamed another popular monthly project and there was no such thing as Project Family - I said to myself, "Well why not? There SHOULD be a Project Family!" And I set about to create my own Project Family....er, project.

I knew it had to have these requirements: Simple, fast (so that we will actually commit to keeping up with it), inexpensive (because I already spend enough money on my scrapbooking supplies), and something that every member of my family can do. This is what I came up with:

First, I took this old wine bottle box that I purchased for 50 cents at a garage sale.

I have nothing against lighthouses (or wine bottle boxes for that matter), but it didn't match my decor. So...I used my January BOAF KIT , full of AUTHENTIQUE papers and other goodies, and turned it into this...
A Few Close-Ups:

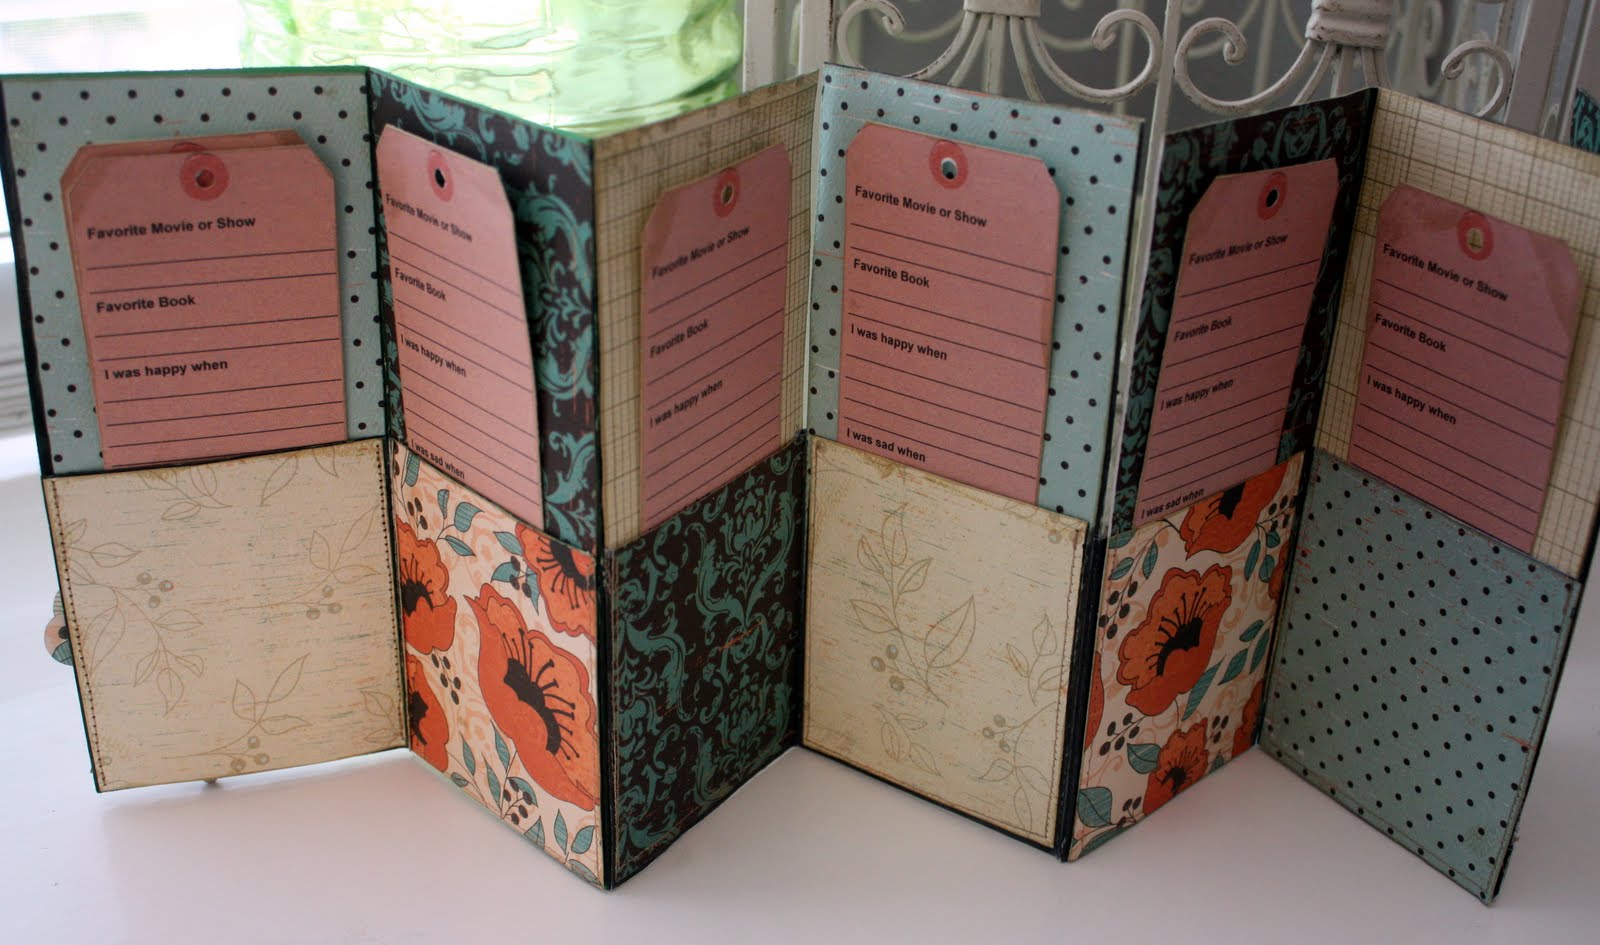
Inside the box is a simple file folder accordian album that I created, which is designed to hold my Project Family Journaling Tags (and enough room left over inside the box to hold any extra little mementos I pick up in 2012).

The front of the accordian album looks like this:

It opens up to reveal six panels on each side (for a total of twelve) with pockets to hold my Project Family Tags.

The tags have simple questions which can quickly be answered by each family member at the end of every month. I left the front of my pockets blank as I plan to put my favorite picture taken each month on the front. At the end of the year, we will have the highs and lows of the past twelve months to review - little things that we most likely would have forgotten had we not taken just a few minutes to write them down (on my handy-dandy tags).

Want to download the tag so you can create your own Project Family? Just click on this Picture and save!

Want to learn how to make my file folder accordian album to hold my Project Family journaling tags? Be sure to check back Tuesday for another video tutorial!

Peace Out!

Friday, November 25, 2011

I Made an Altered Book (yes, I did)


Ta Da!!!!! Here it is, my very first altered book! I have been wanting to make one of these for awhile and finally took the plunge and got started a couple of weeks ago. The hardest part of this was actully finding a book I didn't like enough so that I wouldn't have minor heart failure when I began mutilating it! But, I did locate one that I never finished reading (which almost never happens) because it was THAT boring! So I figured it and I would be a lot happier if it were altered in such a way that I would actually get some enjoyment out of it - and use it as something other than a dust catcher.

The second hardest part was figuring out just HOW to cut out all those pages. Every tutorial I could find only had small niches being cut out or had all the pages taken out and a foam block inserted with the book pages glued around the edges - both great ideas but not what I was looking for.

First, I ended up glueing all my pages together. I did this by getting really thick binder clips and clipping the pages together tightly. I then brushed liberal amounts of an acrylic gel medium along the edges of the papers, which pretty effectively sealed them all together.

Once the pages were dry and firmly stuck together, I drew an outline of opening I wanted cut. Here is where I did cheat: I took the book out to my husband who was already working on a project in the garage. He did the next step, but they were easy, and you can do this part, too! With the back and front cover of the book bent away from the glued pages and clipped together. He drilled a starter hole in two opposite corners of the glued pages. He then used a SABER SAW to cut along the outline that I had drawn. A saber saw is a power tool, but you could also use a COPING SAW or KEYHOLE SAW, which are both manual saws. Believe me, the pages are just too thick to use an exacto knife so a saw of some type is the way to go! Once the middle was cut out, I did use my exacto knife to trim out little rough edges left behind and glued the inside portion of the cut pages the same way, by brushing a gel medium along the pages.

After everything was dried, I decorated the inside of my box simply by cutting out papers to fit and inking everything to "antique" it.

Once the inside was decorated, I started working on the outside. I added a border strip along the spine to imitate a book title:

I wanted texture and dimension on the top, so I brougt out my charms and big handmde fabric flowers.

I used glossy accents to hold all my metal items down.

I crackle painted and inked my chipboard letters:

And, of course, all my papers were from my BIRDS OF A FEATHER November Kit, which is one of my favorite, to date!!!

Now that my altered book is finished, I plan to display it on (where else?) one of my bookshelves. I think I will make a very small mini-album to fit inside it.

Are there any altered projects you would like to try or, even better, have tried? If so, feel free to leave me a comment with the link as I would LOVE to check them out and get more ideas for my own future projects!

Wednesday, August 24, 2011

Everyday Tim Holtz, Marketing Team News, and Sketches!


I don't know about you, but when I think about Tim Holtz I don't normally think...everyday all-occasion cards. And I CERTAINLY don't think "quick design project" that is easy to put together! But...that is exactly what I was able to do last night using my yummy papers and supplies from the Let's Capture Our Memories STORE. I think the main thing that made creating these cards so quick and easy was that I used Timmy-Poo's Crowded Attic paper collection which, much like its namesake, is packed with old, vintage images that are perfect for cardmaking, especially when combined with some of his ribbon or those had-to-have-them-could-not-put-them-down miniature hangers.

Speaking of Let's Capture Our Memories, did you know they are looking for a new MARKETING TEAM? I can tell you from personal experience, this is a fabulous group of ladies to work with! And to get free supplies every month to create your projects - well, it just doesn't get much better than that! Entries are due no later than September 15th, and the term runs from November 2011 to March 2012.

For those of you who are having a hard time finding inspiration or simply finding the time to scrap due to school that has just begun or getting ready to begin, here are a couple of great sketches from my favorite sketch sites:

From SASSY LIL SKETCHES, here is the August Week 3 sketch:


And here is my take on it:


You know the Design Team has come up with lots of great ideas, so if you still need a little inspiration, click HERE.

And, last but not least, from LET'S SCRAP, here is this week's new sketch, hot off the virtual press:


Want to see what the Let's Scrap Girls and I made? Well, you're going to have to click HERE!

Until next time - be creative!